

OAuth 2.0 (第三方登录)前端流程实现
发布于2022-11-19 06:31 阅读(720) 评论(0) 点赞(1) 收藏(3)
目录
一、OAuth是什么
OAuth就是让"客户端"安全可控地获取"用户"的授权,与"服务商提供商"进行互动。也就是大家口中熟知的第三方登录,通过微信号或qq号授权去登录各类app或网站。
因为博主目前是一名菜鸡前端,所以对OAuth的后端实现并不是很了解,所以,本篇文章着重讲OAuth的前端实现思路。
想了解后端运作机制的请点击下面这个大佬写的文章。写的还是非常详细的。虽然我看不太懂。理解OAuth 2.0 - 阮一峰的网络日志![]() https://www.ruanyifeng.com/blog/2014/05/oauth_2_0.html
https://www.ruanyifeng.com/blog/2014/05/oauth_2_0.html
二、OAuth 实现,前端需要做什么
(一)数据收集表单
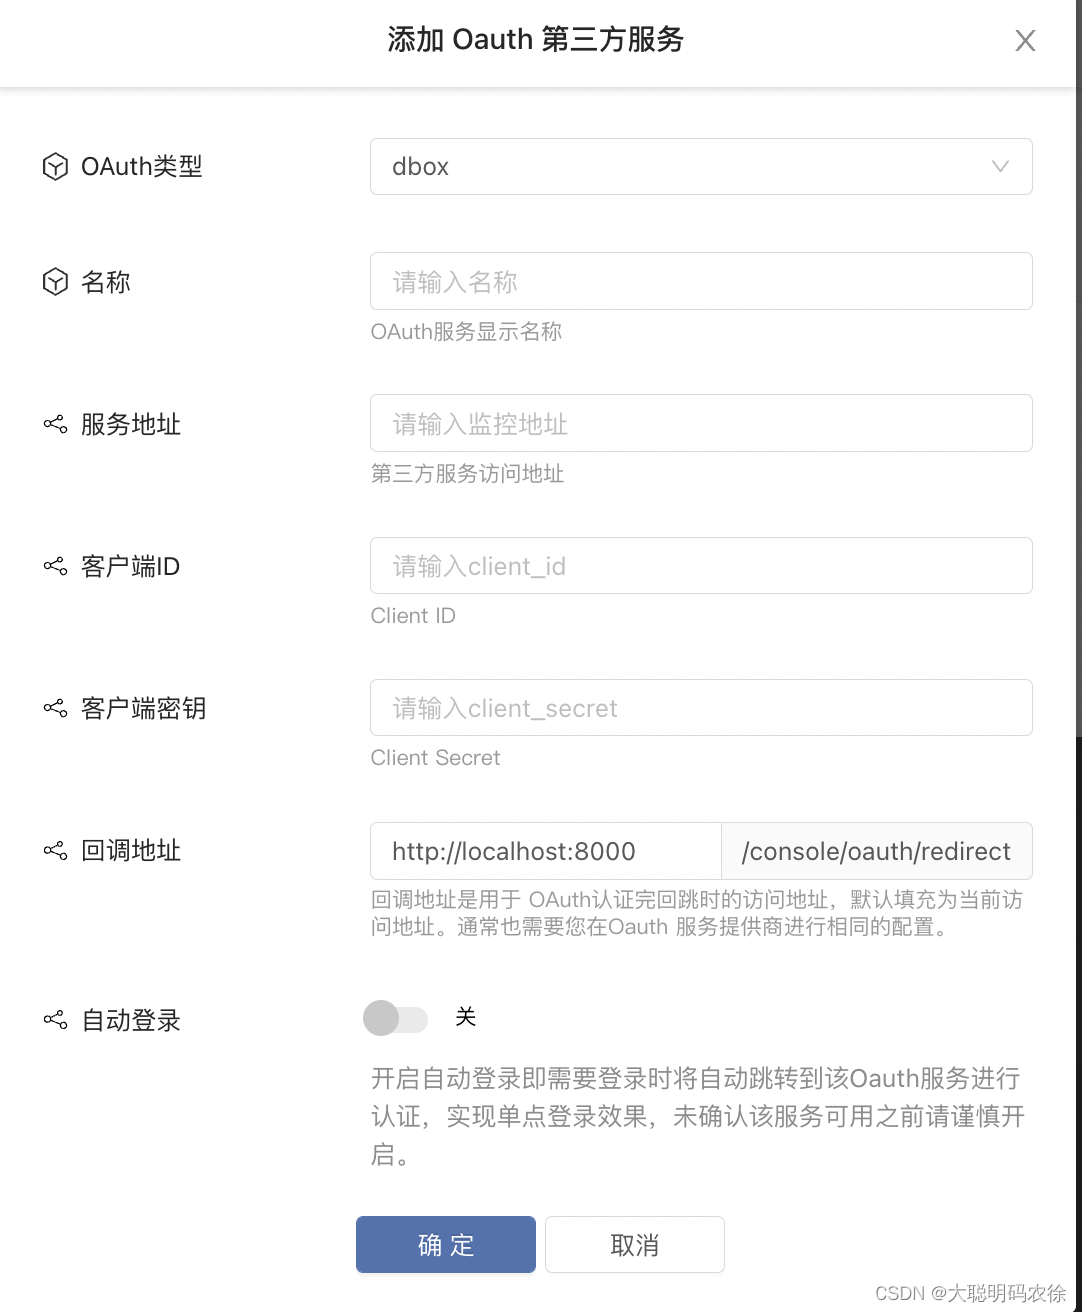
大家对于这个表单可能会有一些不了解的地方,下面我来一一解释一下。
| 字段 | 解释 |
| OAuth类型 | OAuth类型你可以理解为个个应用对于请求地址的参数上传是不一致的,你需要对个个应用的地址做一些相对应的处理,而OAuth类型就可以作为对这些应用的区分的关键信息。 |
| 名称 | 顾名思义,就是名称 |
| 客户端id | Client ID 由第三方软件生成的,唯一的值。 |
| 客户端密钥 | Client Secret 由第三方软件生成的,唯一的值。 |
| 回调地址 | 回调地址是用于 OAuth认证完回跳时的访问地址,默认填充为当前访问地址。通常也需要您在Oauth 服务提供商进行相同的配置 |
| 自动登录 | 这个是平台实现的功能,就是当你已经登录了自己的平台账号,再去点击第三方登录,就跳过第三方的登录页面,直接进入第三方应用。这里是本产品特有的功能。大家可以忽略不计。 |
这里我们通过表单把数据返回给后端,后端再去做一些处理,拼接地址,加密等等。
- handleCreatOauth = values => {
- let {
- name,
- client_id,
- client_secret,
- oauth_type,
- home_url,
- redirect_domain,
- is_auto_login
- } = values;
- oauth_type = oauth_type.toLowerCase();
- if (oauth_type === 'github') {
- home_url = 'https://github.com';
- }
- if (oauth_type === 'aliyun') {
- home_url = 'https://oauth.aliyun.com';
- }
- if (oauth_type === 'dingtalk') {
- home_url = 'https://oapi.dingtalk.com';
- }
- const obj = {
- name,
- client_id,
- client_secret,
- is_auto_login,
- oauth_type,
- redirect_uri: `${redirect_domain}/console/oauth/redirect`,
- home_url,
- is_console: true
- };
- this.handelRequest(obj);
- };
- handelRequest = (obj = {}, isclone) => {
- const { dispatch, eid } = this.props;
- const { oauthInfo, oauthTable, isOpen } = this.state;
- const arr = [...oauthTable];
- obj.eid = eid;
- oauthInfo
- ? (obj.service_id = oauthInfo.service_id)
- : (obj.service_id = null);
- isclone ? (obj.enable = false) : (obj.enable = true);
-
- if (oauthTable && oauthTable.length > 0) {
- oauthTable.map((item, index) => {
- const { service_id } = item;
- arr[index].is_console = true;
- if (oauthInfo && service_id === obj.service_id) {
- arr[index] = Object.assign(arr[index], obj);
- }
- });
- }
- !oauthInfo && arr.push(obj);
- dispatch({
- type: 'global/creatOauth',
- payload: {
- enterprise_id: eid,
- arr
- },
- callback: data => {
- if (data && data.status_code === 200) {
- notification.success({
- message: isOpen
- ? formatMessage({id:'notification.success.open'})
- : isclone
- ? formatMessage({id:'notification.success.close'})
- : oauthInfo
- ? formatMessage({id:'notification.success.edit'})
- : formatMessage({id:'notification.success.add'})
- });
- this.handelOauthInfo();
- }
- }
- });
- };

以上代码是本项目提交事件的触发函数。 可以看到,oauth_type就作为识别各类应用\网站的关键信息。通过识别从而返回不同的home_url,发送给后端。
(二)获取后端返回值
当我们把完整的信息提交给后端以后,在登录页面,我们就要对接对应的第三方登录入口。
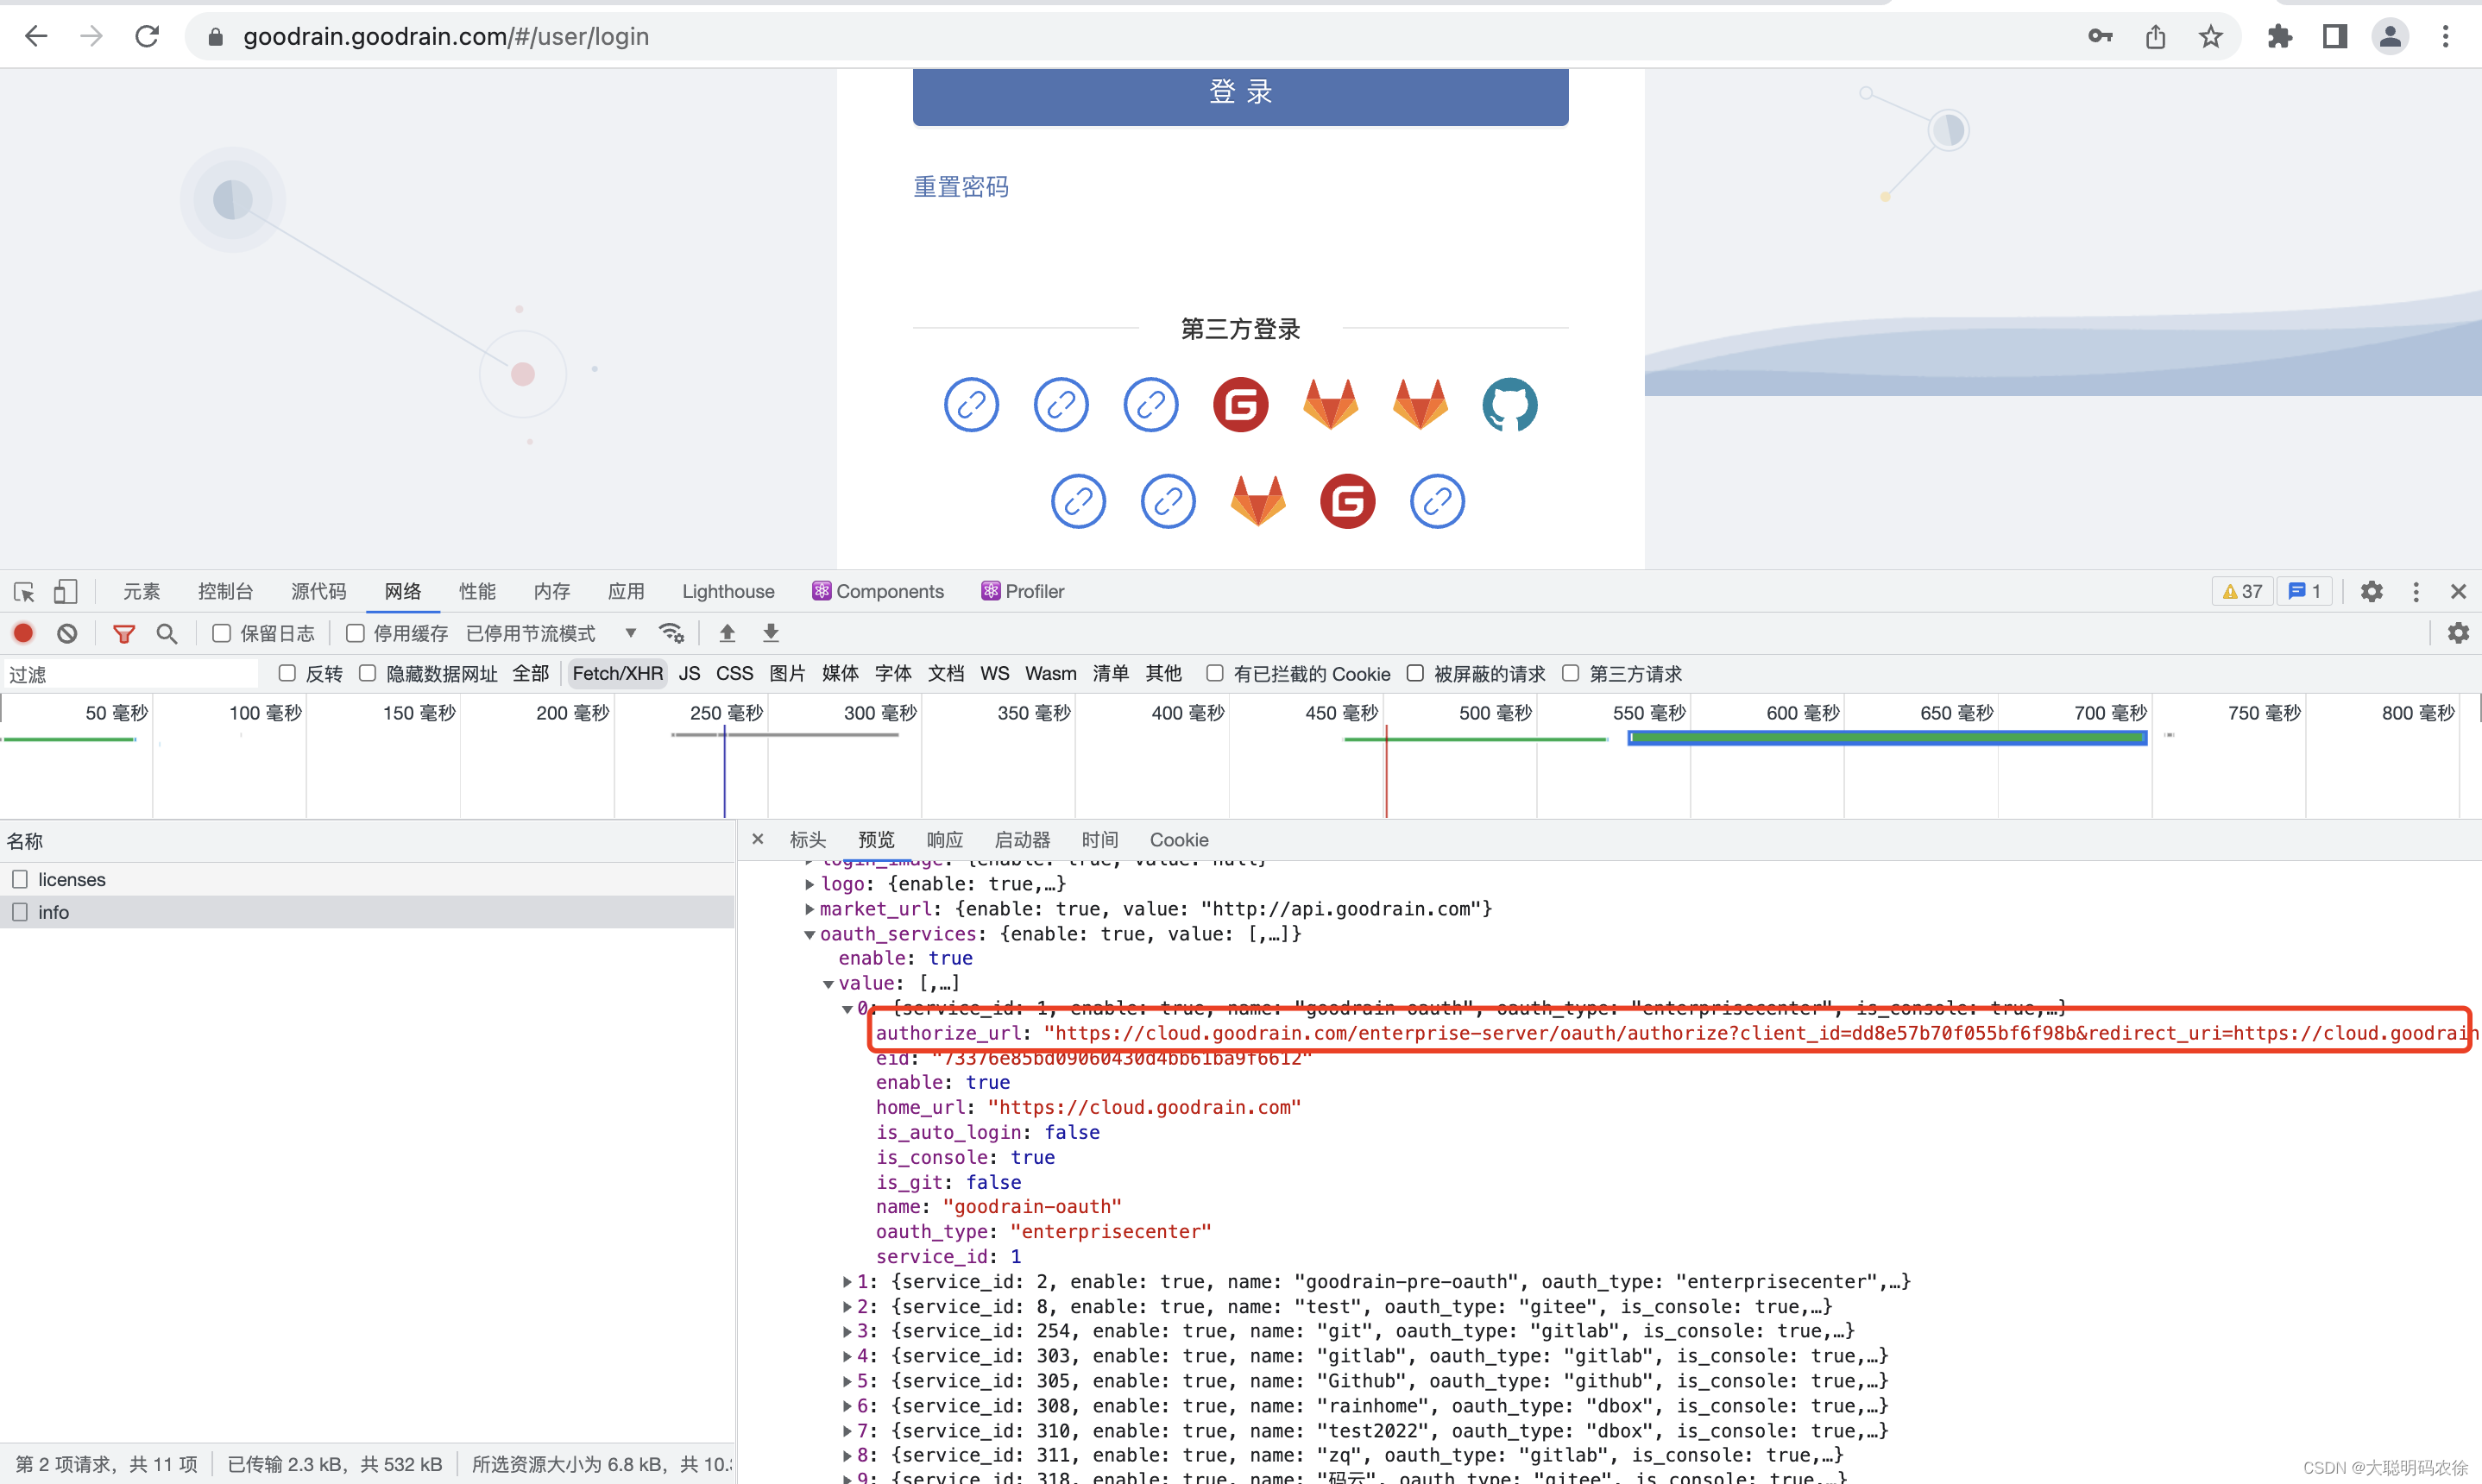
如上图,进入页面以后,先调了一个接口,这里返回了一个关键的信息,就是“authorize_url”。这里我们先暂时不做解释,接着往下看。
- {oauthServicesList.map(item => {
- const { name, service_id } = item;
- return (
- <div className={styles.thirdCol} key={service_id}>
- <Tooltip placement="top" title={name}>
- <a
- style={inlineBlock}
- href={oauthUtil.getAuthredictURL(item)}
- title={name}
- >
- {oauthUtil.getIcon(item)}
- </a>
- </Tooltip>
- </div>
- );
- })}
这里是html部分,oauthServicesList就是获取的上面那个接口返回的对接好的第三方应用,通过map循环渲染出图标,然后a链接点接以后拿到对应的“item”传进该方法然后return出返回值进行跳转。
- getAuthredictURL(item) {
- if (item) {
- const {
- oauth_type: oauthType,
- client_id: clientId,
- auth_url: authUrl,
- redirect_uri: redirectUri,
- service_id: serviceId,
- authorize_url: authorizeUrl
- } = item;
- if (oauthType === 'enterprisecenter' && authorizeUrl) {
- const str = authorizeUrl;
- const agreement = `${window.location.protocol}//`;
- const content = window.location.host;
- const suffix = str.substring(
- str.indexOf('/enterprise-server'),
- str.length
- );
- const newUrl = agreement + content + suffix;
- const isRedirectUrl = newUrl.indexOf('redirect_uri=') > -1;
- const redirectbefore =
- isRedirectUrl && newUrl.substring(0, newUrl.indexOf('redirect_uri='));
-
- const redirectSuffix =
- isRedirectUrl &&
- newUrl.substring(newUrl.indexOf('/console'), newUrl.length);
- const url = isRedirectUrl
- ? `${`${redirectbefore}redirect_uri=${agreement}${content}`}${redirectSuffix}`
- : newUrl;
- return url;
- }
-
- if (authorizeUrl) {
- return authorizeUrl;
- }
- if (oauthType == 'github') {
- return `${authUrl}?client_id=${clientId}&redirect_uri=${redirectUri}?service_id=${serviceId}&scope=user%20repo%20admin:repo_hook`;
- }
- return `${authUrl}?client_id=${clientId}&redirect_uri=${redirectUri}?service_id=${serviceId}&response_type=code`;
- }
- return null;
- },
以上就是 getAuthredictURL方法。可以看到oauth_type仍然作为区分各种类型的关键信息。从而返回不同的url。其中一种判定方法就是当authorizUrl不为空时,返回authorizUrl。这里的authorizUrl就是我上文提到的,后端返回的关键信息'authorize_url'。
https://rainhome.goodrain.com/oauth/authorize?client_id=48948d5082eacd0dd4d9&scope=snsapi_login&redirect_uri=http%3A//localhost%3A8080/console/oauth/redirect%3Fservice_id%3D325&response_type=code"可以看到这条url拼接了很多信息,有client_id,redirect_url等等。并且做了相应的加密处理 。
当我们完成这一步时,前端的工作就已经完成了一半了。
(三)重定向地址及后续处理
还记得在填写表单时有一个重定向地址吗,'redirect_url',在你点击a链接跳转以后,后端进行一系列操作,然后就会调这个重定向的地址,并在地址栏上返回相应的 code码 和 service_id码。然后再调一个认证接口。
当然事前你要写一个对应的路由地址。 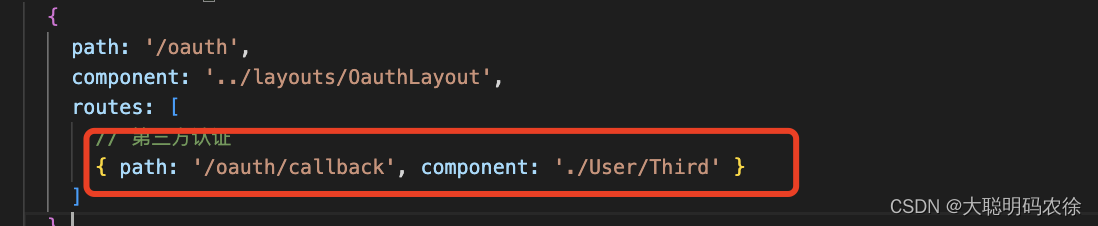
- /* eslint-disable no-underscore-dangle */
- /* eslint-disable camelcase */
- import { message } from 'antd';
- import { connect } from 'dva';
- import { routerRedux } from 'dva/router';
- import React, { Component } from 'react';
- import { formatMessage, FormattedMessage } from 'umi-plugin-locale';
- import Result from '../../components/Result';
- import cookie from '../../utils/cookie';
- import handleAPIError from '../../utils/error';
- import globalUtil from '../../utils/global';
- import rainbondUtil from '../../utils/rainbond';
-
- const loginUrl = '/user/login?disable_auto_login=true';
-
- @connect()
- export default class ThirdLogin extends Component {
- constructor(props) {
- super(props);
- this.state = {
- resultState: 'ing',
- title: formatMessage({id:'login.Third.authentication'}),
- desc: formatMessage({id:'login.Third.wait_for'})
- };
- }
- // eslint-disable-next-line consistent-return
- componentWillMount() {
- const code = rainbondUtil.OauthParameter('code');
- const service_id = rainbondUtil.OauthParameter('service_id');
- const { dispatch } = this.props;
- if (
- code &&
- service_id &&
- code !== 'None' &&
- service_id !== 'None' &&
- code !== '' &&
- service_id !== ''
- ) {
- const token = cookie.get('token');
- // if user login
- if (token) {
- dispatch({ type: 'global/hideNeedLogin' });
- dispatch({
- type: 'user/fetchThirdLoginBinding',
- payload: {
- code,
- service_id
- },
- callback: res => {
- if (res) {
- const status = res.response_data && res.response_data.status;
- if (status && status === 400) {
- this.setState(
- {
- resultState: 'error',
- title: formatMessage({id:'login.Third.Failed'}),
- desc: formatMessage({id:'login.Third.Authentication'})
- },
- () => {
- setTimeout(() => {
- this.handleLoginUrl();
- }, 1000);
- }
- );
- } else if (res.status_code && res.status_code === 200) {
- this.setState(
- {
- resultState: 'success',
- title: formatMessage({id:'login.Third.success'}),
- desc: ''
- },
- () => {
- if (res.bean && res.bean.token) {
- cookie.set('token', res.bean.token);
- }
- this.handleSuccess();
- }
- );
- } else {
- this.handleLoginUrl();
- }
- } else {
- this.handleLoginUrl();
- }
- },
- handleError: err => {
- this.handleError(err);
- }
- });
- return null;
- }
- globalUtil.removeCookie();
- // if not login
- dispatch({
- type: 'user/fetchThirdCertification',
- payload: {
- code,
- service_id,
- domain: window.location.host
- },
- callback: res => {
- if (res) {
- const status = res.response_data && res.response_data.status;
- if (
- status &&
- (status === 400 || status === 401 || status === 404)
- ) {
- this.setState(
- {
- resultState: 'error',
- title: formatMessage({id:'login.Third.Failed'}),
- desc: res.msg_show || formatMessage({id:'login.Third.token'})
- },
- () => {
- setTimeout(() => {
- this.handleLoginUrl();
- }, 1000);
- }
- );
- } else if (res.status_code === 200) {
- const data = res.bean;
- if (data && data.token) {
- cookie.set('token', data.token);
- this.handleSuccess();
- return null;
- }
- if (data && data.result) {
- // if not login
- if (!data.result.is_authenticated) {
- dispatch(
- routerRedux.push(
- `/user/third/register?code=${data.result.code}&service_id=${data.result.service_id}&oauth_user_id=${data.result.oauth_user_id}&oauth_type=${data.result.oauth_type}`
- )
- );
- } else {
- dispatch(
- routerRedux.push(
- `/user/third/login?code=${data.result.code}&service_id=${data.result.service_id}&oauth_user_id=${data.result.oauth_user_id}&oauth_type=${data.result.oauth_type}`
- )
- );
- }
- }
- } else {
- this.handleLoginUrl();
- }
- } else {
- this.handleLoginUrl();
- }
- },
- handleError: err => {
- this.handleError(err);
- }
- });
- } else {
- globalUtil.removeCookie();
- dispatch(routerRedux.replace(loginUrl));
- }
- }
- handleLoginUrl = () => {
- const { dispatch } = this.props;
- dispatch(routerRedux.push(loginUrl));
- };
- handleError = err => {
- const status = (err && err.status) || (err.response && err.response.status);
- if (status && status === 500) {
- message.warning(formatMessage({id:'login.Third.again'}));
- } else {
- handleAPIError(err);
- }
- setTimeout(() => {
- this.handleLoginUrl();
- }, 1000);
- };
- handleSuccess = () => {
- const { dispatch } = this.props;
- let redirect = window.localStorage.getItem('redirect');
- if (!redirect || redirect === '') {
- redirect = '/';
- }
- window.localStorage.setItem('redirect', '');
- if (redirect.startsWith('/')) {
- dispatch(routerRedux.push(redirect));
- } else {
- window.location.href = redirect;
- }
- };
-
- render() {
- const { resultState, title, desc } = this.state;
- return (
- <Result
- type={resultState}
- title={title}
- description={desc}
- style={{
- marginTop: '20%',
- marginBottom: 16
- }}
- />
- );
- }
- }
这里的判断有些多,先判断有没有登录再判断认证成功不成功,如果登录了并认证成功则将返回的token值设置到cookie的token里然后直接进入应用,登录了但失败则返回认证失败。如果没登录则直接跳转到第三方应用的登录页面。如果都登陆了,但登录的账号没有与本平台关联的账号,则跳转到本平台的登录/注册页面。当你再次登陆时就会将登陆的账号与第三方账号进行关联了。
这样就形成了一个闭环。也就完成了OAuth认证前端该做的所有事情。
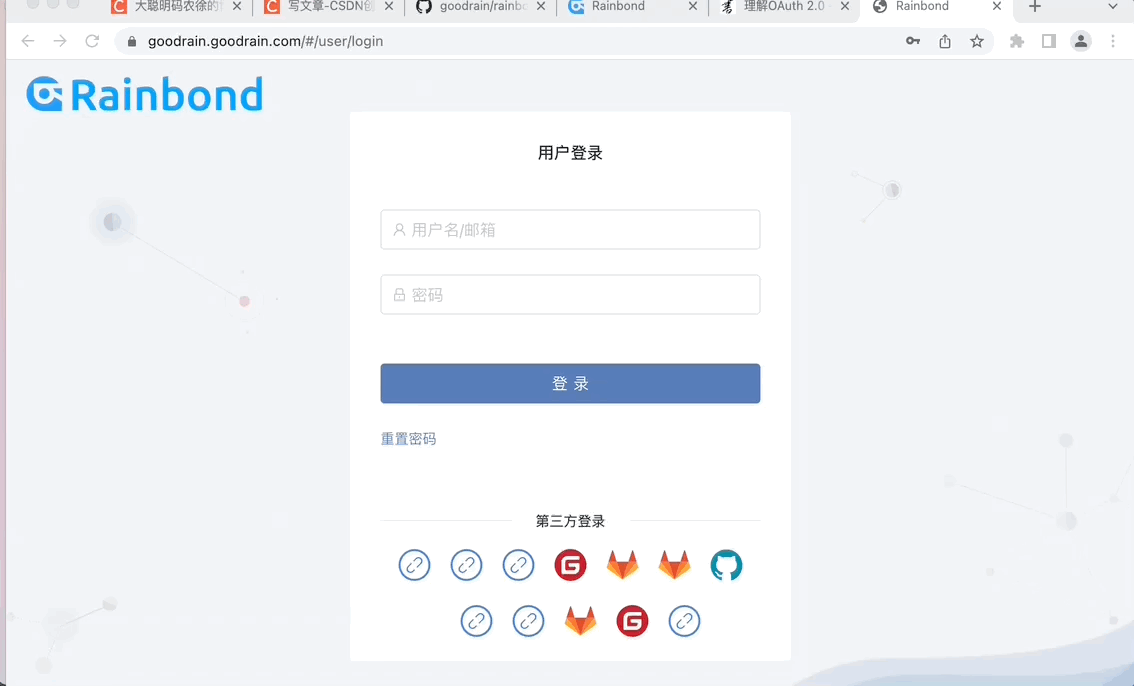
以下为实现效果。
三、项目地址
主项目地址:
 https://github.com/goodrain/rainbond
前端项目地址 :
src > components > OauthForm > index.js
登录页面地址:
src > pages > user > login.js
重定向页面地址:
src > pages > user > Third.js
获取a链接url工具地址:
src > utils > oauth.js
代码已经开源,欢迎fork与start!
原文链接:https://blog.csdn.net/qq_45799465/article/details/127634189
所属网站分类: 技术文章 > 博客
作者:天使的翅膀
链接:http://www.qianduanheidong.com/blog/article/455448/755d525f18cb9a1675e4/
来源:前端黑洞网
任何形式的转载都请注明出处,如有侵权 一经发现 必将追究其法律责任
昵称:
评论内容:(最多支持255个字符)
---无人问津也好,技不如人也罢,你都要试着安静下来,去做自己该做的事,而不是让内心的烦躁、焦虑,坏掉你本来就不多的热情和定力