

Vue2 源码解析: MVVM 双向绑定3 - 模版编译实现
发布于2021-05-30 12:09 阅读(1549) 评论(0) 点赞(19) 收藏(5)
Vue2 源码解析: MVVM 双向绑定3 - 模版编译实现
文章目录
前言(长文慎入!)
经过前两篇的学习
我们终于来到 Vue 源码解析的最后一个阶段:模版编译。核心内容在于生成模版内容(template)对应的 渲染函数(render),再透过运行时动态执行并绑定数据,从而生成新的虚拟 DOM 树,最后进入 patch 并更新真实 DOM 的过程。
下面我们就来看看在 Vue 源码中的模版编译具体是怎么实现的吧。
正文
回顾:MVVM 全流程
我们先来回顾一下在前两篇(响应式原理 & 虚拟 DOM & diff 算法)完成后,到目前为止的 MVVM 架构应该长成下面这样
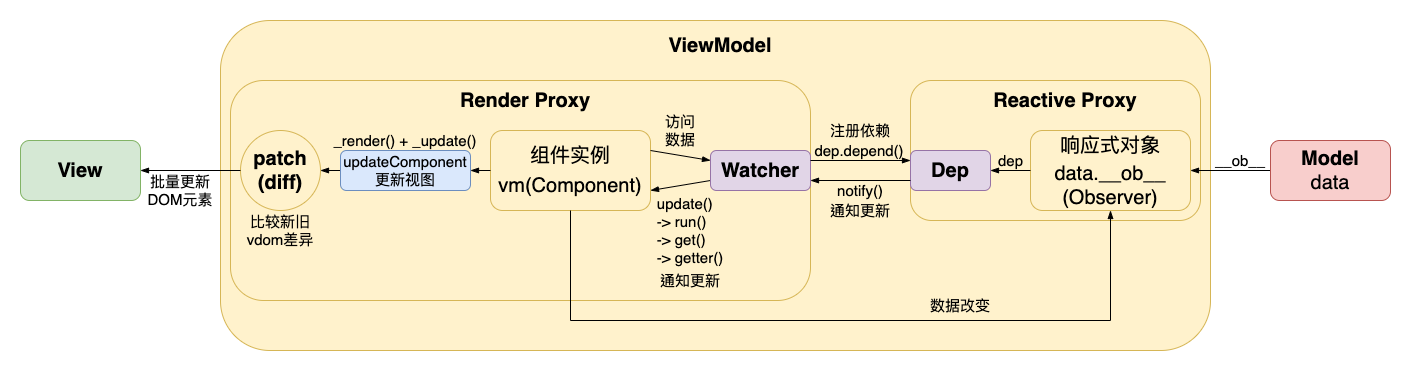
看起来整个 MVVM 的整个流程架构已经非常完整的。然而还残留一个问题是:用户是透过某种模版来编写源码的,实际上源码又是如何转变为真正的 VNode 虚拟 DOM 节点呢?
也就是说实际上我们还需要构建一个编译器(compiler),用于将用户的模版代码转变为某个 虚拟 DOM 生成函数(render) 如下图。
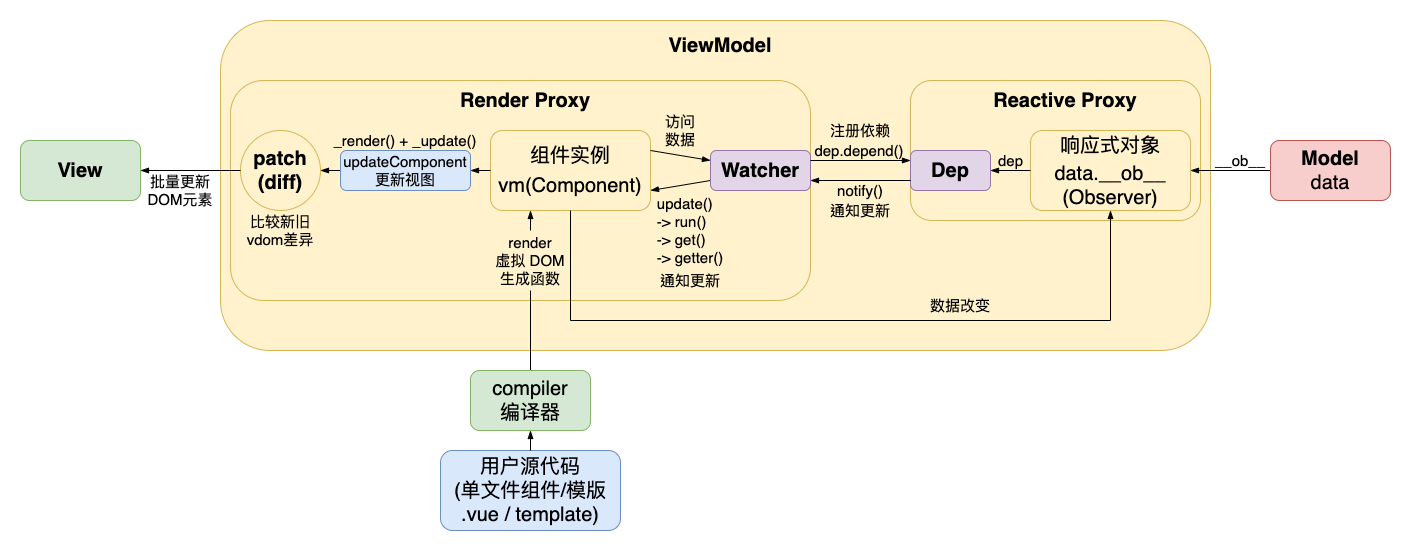
由于用户编写的仅仅只是声明式模版,而具体运行时的数据却会随着时间不断改变,进而构造出动态的页面,这时候我们就不可以使用硬编码直接将用户的模版变成具体的 VNode,而是构建出一个创建 VNode 的虚拟 DOM 生成函数 render。如此一来我们才可以不断复用这个 render 函数,并在每次数据修改后重新渲染出新的 DOM 树,接着再进入 diff 算法(patch 函数)的比较新旧树来更新真实 DOM 的环节。
而这也是这个阶段的命名由来:模版编译 的意思就是保留模版(转变为 render 方法),并在每次更新数据时重复使用用于生成新的虚拟 DOM 来进行比对和批量更新
下面我们就从源码的角度来看看模版编译的具体流程。
1. $mount 组件挂载
首先我们先回顾一下在我们创建并初始化好 Vue 实例的时候,调用一个 Vue.prototype.$mount 方法,来将"组件"挂载到目标元素上。
/src/platforms/web/runtime/index.js(阅读笔记文件路径:/src/platforms/web/runtime/index.js)
// 注入 Vue.prototype.$mount
Vue.prototype.$mount = function (
  el?: string | Element,
  hydrating?: boolean
): Component {
  el = el && inBrowser ? query(el) : undefined
  return mountComponent(this, el, hydrating)
}
然而上面的仅仅只是运行时的版本,由于通常用脚手架创建或是根据自己搭建的 webpack 打包工作流大多会使用 vue-loader 来进行编译,将模版编译成具体的虚拟 DOM 生成函数 render 而这也是我们本篇的重点,所以我们再来看看编译 + 运行时的版本里面的 $mount 方法又是张怎样
/src/platforms/web/entry-runtime-with-compiler.js(阅读笔记文件路径:/src/platforms/web/entry-runtime-with-compiler/$mount.js)
import config from 'core/config'
import { warn, cached } from 'core/util/index'
import { mark, measure } from 'core/util/perf'

import Vue from './runtime/index'
import { query } from './util/index'
import { compileToFunctions } from './compiler/index'
import { shouldDecodeNewlines, shouldDecodeNewlinesForHref } from './util/compat'

/* 定义新的 $mount 函数(附加编译阶段) */
const mount = Vue.prototype.$mount
Vue.prototype.$mount = function (
  el?: string | Element,
  hydrating?: boolean
): Component {
  /* 根据 el 传入的选择器获取 DOM 元素 */
  el = el && query(el)

  if (el === document.body || el === document.documentElement) {
    // mount to <html>, <body> warning ...
    return this
  }

  const options = this.$options
  /* 根据 el / template 预先进行模版编译 */
  if (!options.render) {
    let template = options.template
    if (template) {
      /* 1. 使用 template 选项 */
      if (typeof template === 'string') {
        /* case 1: template = '#xxx',传入 id 选择器 */
        if (template.charAt(0) === '#') {
          template = idToTemplate(template)
          // template not found warning ...
        }
      } else if (template.nodeType) {
        /* case 2: template = Element,直接传入模版节点 */
        template = template.innerHTML
      } else {
        /* case 3: unknown template option */
        // unknown template option warning ...
        return this
      }
    } else if (el) {
      /* 2. 使用 el 选项(不使用模版) -> 解析 el 传入的选择器 */
      template = getOuterHTML(el)
    }
    // 如果使用模版,则进行模版编译
    if (template) {
      // mark compile ...

      // 生成 render 渲染函数
      const { render, staticRenderFns } = compileToFunctions(template, {
        outputSourceRange: process.env.NODE_ENV !== 'production',
        shouldDecodeNewlines,
        shouldDecodeNewlinesForHref,
        delimiters: options.delimiters,
        comments: options.comments
      }, this)
      options.render = render
      options.staticRenderFns = staticRenderFns

      // mark compile end & measure ...
    }
  }
  // 直接根据 el 进行注水(渲染)
  return mount.call(this, el, hydrating)
}
我们看到首先先将运行时版本的 $mount 函数保留下来
const mount = Vue.prototype.$mount
再来重新定义一个新的附带运行时的代码
1.1 template 获取模版
编译代码的核心在于
/* 根据 el / template 预先进行模版编译 */
  if (!options.render) {
    let template = options.template
    if (template) {
      /* 1. 使用 template 选项 */
      // ...
    } else if (el) {
      /* 2. 使用 el 选项(不使用模版) -> 解析 el 传入的选择器 */
      // ...
    }
    // 如果使用模版,则进行模版编译
    if (template) {
      // mark compile ...

      // 生成 render 渲染函数
      const { render, staticRenderFns } = compileToFunctions(template, {
        outputSourceRange: process.env.NODE_ENV !== 'production',
        shouldDecodeNewlines,
        shouldDecodeNewlinesForHref,
        delimiters: options.delimiters,
        comments: options.comments
      }, this)
      options.render = render
      options.staticRenderFns = staticRenderFns

      // mark compile end & measure ...
    }
我们的目标就是生成 render 函数,所以第一步先检查 $options.render 是否存在,不存在时就需要先获取模版然后进行编译
1.1.1 idToTemplate 根据 id 选择器获取模版
获取模版代码的途径有两种,第一种是传入 id 选择器
if (typeof template === 'string') {
  /* case 1: template = '#xxx',传入 id 选择器 */
  if (template.charAt(0) === '#') {
    template = idToTemplate(template)
    // template not found warning ...
  }
对于这种情况则要用 idToTemplate 方法来获取模版
/src/platforms/web/entry-runtime-with-compiler.js(阅读笔记文件路径:/src/platforms/web/entry-runtime-with-compiler/idToTemplate.js)
// 透过 query 方法获取 id 指向的 DOM 元素
const idToTemplate = cached(id => {
  const el = query(id)
  return el && el.innerHTML
})
1.1.2 getOuterHTML 根据 DOM 元素获取模版
第二种情况则是直接传入元素节点
} else if (el) {
  /* 2. 使用 el 选项(不使用模版) -> 解析 el 传入的选择器 */
  template = getOuterHTML(el)
}
则使用 getOuterHTML 来获取包括最外层的 HTML 模版
/src/platforms/web/entry-runtime-with-compiler.js(阅读笔记文件路径:/src/platforms/web/entry-runtime-with-compiler/getOuterHTML.js)
/* 根据 el 获取完整模版字符串 */
function getOuterHTML (el: Element): string {
  if (el.outerHTML) {
    return el.outerHTML
  } else {
    const container = document.createElement('div')
    container.appendChild(el.cloneNode(true))
    return container.innerHTML
  }
}
1.2 compileToFunctions 创建虚拟 VNode 节点生成函数 render
在获取到模版之后,就是调用 compileToFunctions 方法来生成我们需要的 render 函数
    // 如果使用模版,则进行模版编译
    if (template) {
      // mark compile ...

      // 生成 render 渲染函数
      const { render, staticRenderFns } = compileToFunctions(template, {
        outputSourceRange: process.env.NODE_ENV !== 'production',
        shouldDecodeNewlines,
        shouldDecodeNewlinesForHref,
        delimiters: options.delimiters,
        comments: options.comments
      }, this)
      options.render = render
      options.staticRenderFns = staticRenderFns

      // mark compile end & measure ...
    }
compileToFunctions 具体做了什么事我们后面再说,这边只要知道到此我们就已经成功将源码的模版编译成一个 虚拟 VNode 节点生成函数:render,然后将它赋值到 $options.render 上
1.3 mountComponent 更新组件 / 首次挂载组件
当我们透过模版编译生成了 render 函数后,我们又是在那边调用的呢?重新回到原始的 $mount 方法
/src/platforms/web/runtime/index.js(阅读笔记文件路径:/src/platforms/web/runtime/index.js)
// 注入 Vue.prototype.$mount
Vue.prototype.$mount = function (
  el?: string | Element,
  hydrating?: boolean
): Component {
  el = el && inBrowser ? query(el) : undefined
  return mountComponent(this, el, hydrating)
}
在原本的版本之前我们已经透过 compileToFunctions 生成 $options.render 函数了,所以最后一步就是调用 mountComponent 来挂载组件
之前写过的 Vue 源码解析: 生命周期钩子全面剖析 已经全面解析过整个 Vue 实例的生命周期了,所以这边我们直接进入到 mountComponent 去看 render 方法的调用时机
/src/core/instance/lifecycle.js(阅读笔记文件路径:/src/core/instance/lifecycle/mountComponent.js)
// 挂载实例

export function mountComponent (
  vm: Component,
  el: ?Element,
  hydrating?: boolean
): Component {
  vm.$el = el
  if (!vm.$options.render) {
    vm.$options.render = createEmptyVNode
    // missing template or render warning ...
  }
  callHook(vm, 'beforeMount')

  let updateComponent
  if (process.env.NODE_ENV !== 'production' && config.performance && mark) {
    // production.version update ...
  } else {
    updateComponent = () => {
      vm._update(vm._render(), hydrating)
    }
  }

  // 创建观察者并挂载到 vm._watcher 上
  new Watcher(vm, updateComponent, noop, {
    before () {
      if (vm._isMounted && !vm._isDestroyed) {
        callHook(vm, 'beforeUpdate')
      }
    }
  }, true /* isRenderWatcher */)
  hydrating = false

  // 调用 mounted 生命周期钩子
  if (vm.$vnode == null) {
    vm._isMounted = true
    callHook(vm, 'mounted')
  }
  return vm
}
整段代码我们只需要注意两点:
updateComponent更新组件方法
  let updateComponent
  if (process.env.NODE_ENV !== 'production' && config.performance && mark) {
    // production.version update ...
  } else {
    updateComponent = () => {
      vm._update(vm._render(), hydrating)
    }
  }
- Watcher 创建观察者
  // 创建观察者并挂载到 vm._watcher 上
  new Watcher(vm, updateComponent, noop, {
    before () {
      if (vm._isMounted && !vm._isDestroyed) {
        callHook(vm, 'beforeUpdate')
      }
    }
  }, true /* isRenderWatcher */)
1.3.1 Watcher 的创建到渲染组件
我们继续回溯记忆,回到观察者创建的过程
/src/core/observer/watcher.js(阅读笔记文件路径:/src/core/observer/watcher/constructor_get.js)
/* @flow */

import {
  warn,
  remove,
  isObject,
  parsePath,
  _Set as Set,
  handleError,
  noop
} from '../util/index'

import { traverse } from './traverse'
import { queueWatcher } from './scheduler'
import Dep, { pushTarget, popTarget } from './dep'

import type { SimpleSet } from '../util/index'

let uid = 0

/* 观察者对象 */
export default class Watcher {

  // ...

  constructor (
    vm: Component,
    expOrFn: string | Function,
    cb: Function,
    options?: ?Object,
    isRenderWatcher?: boolean
  ) {
    // ...

    this.getter = expOrFn

    /**
     * invoke getter
     */
    this.value = this.lazy
      ? undefined
      : this.get()
  }

  /**
   * 取值:
   *   调用 getter
   *   traverse 递归遍历
   */
  get () {
    pushTarget(this)
    let value
    const vm = this.vm
    try {
      value = this.getter.call(vm, vm)
    } catch (e) {
      if (this.user) {
        handleError(e, vm, `getter for watcher "${this.expression}"`)
      } else {
        throw e
      }
    } finally {
      // "touch" every property so they are all tracked as
      // dependencies for deep watching
      if (this.deep) {
        traverse(value)
      }
      popTarget()
      this.cleanupDeps()
    }
    return value
  }

}
核心的部分在于首先先把之前的 updateComponent 赋值成 watcher.getter,然后第一次调用 get 方法
    // ...

    this.getter = expOrFn

    /**
     * invoke getter
     */
    this.value = this.lazy
      ? undefined
      : this.get()
而 get 方法中则会调用 getters 也就是前面的 updateComponent 函数
    const vm = this.vm
    try{
      value = this.getter.call(vm, vm)
到这边就够了,所以我们现在知道在创建观察者的同时(new Watcher),会第一次调用 updateComponent 方法,下面我们看看里面在干嘛
1.3.2 updateComponent -> _render 生成 VNode 虚拟节点
/src/core/instance/lifecycle.js(阅读笔记文件路径:/src/core/instance/lifecycle/mountComponent.js)
    updateComponent = () => {
      vm._update(vm._render(), hydrating)
    }
我们看到 updateComponent 就是先调用 _render 方法,再调用 _update 方法。
在前几篇中已经提过 _render 方法的含义就是生成当前数据对应的虚拟 DOM 树;_update 则是比较新旧两颗树的差异再对真实 DOM 进行批量更新。下面再看到 _render 方法里面
/src/core/instance/render.js(阅读笔记文件路径:/src/core/instance/render/renderMixin.flat2._render.js)
// Vue.prototype._render 渲染细节

export function renderMixin (Vue: Class<Component>) {
  /* 注入 render helpers */
  installRenderHelpers(Vue.prototype)

  Vue.prototype.$nextTick = function (fn: Function) {
    return nextTick(fn, this)
  }

  Vue.prototype._render = function (): VNode {
    const vm: Component = this
    const { render, _parentVnode } = vm.$options

    if (_parentVnode) {
      vm.$scopedSlots = normalizeScopedSlots(
        _parentVnode.data.scopedSlots,
        vm.$slots,
        vm.$scopedSlots
      )
    }

    // 保留父节点接入点
    vm.$vnode = _parentVnode
    // render self
    let vnode
    try {
      /* 递归创建 VNode */
      currentRenderingInstance = vm
      vnode = render.call(vm._renderProxy, vm.$createElement)
    } catch (e) {
      // render exception handling ...
      // ensure vnode exists
      vnode = vm._vnode
    } finally {
      currentRenderingInstance = null
    }
    // 接受包含唯一一个 VNode 的数组
    if (Array.isArray(vnode) && vnode.length === 1) {
      vnode = vnode[0]
    }
    // 保证 vnoe 存在
    if (!(vnode instanceof VNode)) {
      // multiple root node warning ...
      vnode = createEmptyVNode()
    }
    // set parent
    vnode.parent = _parentVnode
    return vnode
  }
}
看起来很长,好像做了好多事,其实具体生成 VNode 的方法就一句话
    const { render, _parentVnode } = vm.$options

    // ...

      vnode = render.call(vm._renderProxy, vm.$createElement)
我们看到其实具体生成 VNode 方法就是我们刚刚透过 compileToFunctions 方法生成并添加到 $options 里面的 render 方法。
哗终于明白了,其实 _render 方法就是对生成的 vnode 做一些检查和过滤,其用于生成 VNode 的核心方法还是前面生成的 $options.render 方法,下面我们就来看看这生成的 render 方法到底是个什么玩意儿。
2. 模版编译原理
前一小节我们重新梳理了一通 Vue 的源码,从生成 VNode 虚拟节点的角度重新看待 Vue 的运行过程,下面我们正式进入模版编译的主要内容。
其实接下来的模版编译的核心就是回答下列几个问题:
render函数是什么东西,跟我们写的模版代码有什么关系?(template -> render)- 整个模版编译的过程是怎么处理我们的源码的?(parse、optimize、generate)
- 模版编译的过程势必设计对模版 dom 生成 AST,而这个 AST 是转换成
render虚拟节点生成方法的?(genXxx)
2.1 compileToFunctions 在哪里?
我们返回到 render 产生的现场
/src/platforms/web/entry-runtime-with-compiler.js(阅读笔记文件路径:/src/platforms/web/entry-runtime-with-compiler/$mount.js)
    // 如果使用模版,则进行模版编译
    if (template) {
      // mark compile ...

      // 生成 render 渲染函数
      const { render, staticRenderFns } = compileToFunctions(template, {
        outputSourceRange: process.env.NODE_ENV !== 'production',
        shouldDecodeNewlines,
        shouldDecodeNewlinesForHref,
        delimiters: options.delimiters,
        comments: options.comments
      }, this)
      options.render = render
      options.staticRenderFns = staticRenderFns

      // mark compile end & measure ...
    }
我们看到我们将模版 template 传入 compileToFunctions 方法,就返回了我们需要的 render 方法,再向下探
/src/platforms/web/compiler/index.js(阅读笔记文件路径:/src/platforms/web/compiler/index.js)
/* @flow */

import { baseOptions } from './options'
import { createCompiler } from 'compiler/index'

/* 根据 baseOptions 选,项使用 createCompiler 创建模版编译函数 */
const { compile, compileToFunctions } = createCompiler(baseOptions)

export { compile, compileToFunctions }
而我们发现 compileToFunctions 又是根据一个 createCompiler 方法生成的
2.1.1 baseOptions 平台相关编译选项
在看 createCompiler 方法主体之前,我们先来看看作为参数的 baseOptions 是怎么一回事
/src/platforms/web/compiler/options.js(阅读笔记文件路径:/src/platforms/web/compiler/options.js)
/* @flow */

import {
  isPreTag,
  mustUseProp,
  isReservedTag,
  getTagNamespace
} from '../util/index'

import modules from './modules/index'
import directives from './directives/index'
import { genStaticKeys } from 'shared/util'
import { isUnaryTag, canBeLeftOpenTag } from './util'

/* 一些编译时会用到的与平台相关的编译选项 */
export const baseOptions: CompilerOptions = {
  expectHTML: true,
  modules,
  directives,
  isPreTag,
  isUnaryTag,
  mustUseProp,
  canBeLeftOpenTag,
  isReservedTag,
  getTagNamespace,
  staticKeys: genStaticKeys(modules)
}
我们发现,其实又跟 patch 方法当时一样,透过 xxxOptions 来提供一些平台相关的节点函数,来协助我们的编译过程,后面在编译函数内部我们就会看到调用一些 baseOptions 方法的部分
2.1.2 createCompiler 生成编译函数
下面我们回到生成 compileToFunctions 方法的 createCompiler 函数主体
/src/compiler/index.js(阅读笔记文件路径:/src/compiler/index.js)
/* @flow */

import { parse } from './parser/index'
import { optimize } from './optimizer'
import { generate } from './codegen/index'
import { createCompilerCreator } from './create-compiler'

/* 创建模版编译函数 */
export const createCompiler = createCompilerCreator(function baseCompile (
  template: string,
  options: CompilerOptions
): CompiledResult {
  // 解析 html 文本
  const ast = parse(template.trim(), options)
  if (options.optimize !== false) {
    // 优化 AST 节点树(标记静态节点)
    optimize(ast, options)
  }
  // 生成渲染代码
  const code = generate(ast, options)
  return {
    ast,
    render: code.render,
    staticRenderFns: code.staticRenderFns
  }
})
我们可以看到这个 createCompiler 又是调用 createCompilerCreator 方法创建的函数,不过我们到此打住,以为其实 createCompilerCreator 不过是对作为参数的 baseCompile 进行一些封装和变换,也就是说这里的 baseCompile 其实就是我们的编译器主体了
我们看到 baseCompile 接受模版文本 template 和刚刚的 baseOptions 选项作为参数,经过一系列操作(parse、optimize、generate)之后就生成了我们的最终 render 方法了(code.render)
2.2 模版编译整体运行流程(图解)
在具体说明代码流程之前,我们先来看张抽象的完整流程图

前面我们提过 createCompilerCreator、createCompiler 都是用于生成最终的编译函数 compileToFunctions,而 compileToFunctions 则是调用了 baseCompile 来为我们生成最终的 AST 和 render 方法
在这样的流程基础下,我们需要关注的核心便是 baseCompile 中所定义的基本流程
  // 解析 html 文本
  const ast = parse(template.trim(), options)
  if (options.optimize !== false) {
    // 优化 AST 节点树(标记静态节点)
    optimize(ast, options)
  }
  // 生成渲染代码
  const code = generate(ast, options)
  return {
    ast,
    render: code.render,
    staticRenderFns: code.staticRenderFns
  }
根据代码我们看得出来 baseCompile 函数核心一共分为三个阶段:
parse模版解析阶段:负责解析代码中的模版并生成 ASToptimize优化阶段:遍历 AST 并为静态节点打标记generate生成代码阶段:根据 AST 生成相应的render方法代码
下面我们就一个个来看各个阶段的任务
2.3 parse 解析阶段
首先第一个阶段我们调用了 parse 方法用于生成 AST
  // 解析 html 文本
  const ast = parse(template.trim(), options)
往里看
/src/compiler/parser/index.js(阅读笔记文件路径:/src/compiler/parser/index/parse.flat2.js)
/* 解析模版 */
export function parse (
  template: string,
  options: CompilerOptions
): ASTElement | void {
  // configure init ...
  warn = options.warn || baseWarn

  platformIsPreTag = options.isPreTag || no
  platformMustUseProp = options.mustUseProp || no
  platformGetTagNamespace = options.getTagNamespace || no
  const isReservedTag = options.isReservedTag || no
  maybeComponent = (el: ASTElement) => !!el.component || !isReservedTag(el.tag)

  transforms = pluckModuleFunction(options.modules, 'transformNode')
  preTransforms = pluckModuleFunction(options.modules, 'preTransformNode')
  postTransforms = pluckModuleFunction(options.modules, 'postTransformNode')

  delimiters = options.delimiters

  // local init ...
  const stack = []
  const preserveWhitespace = options.preserveWhitespace !== false
  const whitespaceOption = options.whitespace
  let root
  let currentParent
  let inVPre = false
  let inPre = false
  let warned = false

  /* 单次警告(用于 v-once 解析) */
  function warnOnce (msg, range) {/* ... */}

  /* 元素闭合 */
  function closeElement (element) {/* ... */}

  /* 移除尾部空白 & 空白节点 */
  function trimEndingWhitespace (el) {/* ... */}

  /* 检查根节点标签 & 属性 */
  function checkRootConstraints (el) {/* ... */}

  /* 解析 html */
  parseHTML(template, {
    warn,
    expectHTML: options.expectHTML,
    isUnaryTag: options.isUnaryTag,
    canBeLeftOpenTag: options.canBeLeftOpenTag,
    shouldDecodeNewlines: options.shouldDecodeNewlines,
    shouldDecodeNewlinesForHref: options.shouldDecodeNewlinesForHref,
    // 保留注释选项
    shouldKeepComment: options.comments,
    outputSourceRange: options.outputSourceRange,
    /* 解析开始标签 */
    start (tag, attrs, unary, start, end) {/* ... */}
    /* 解析结束标签 */
    end (tag, start, end) {/* ... */}
    /* 解析文本内容 */
    chars (text: string, start: number, end: number) {/* ... */}
    /* 解析注释标签 */
    comment (text: string, start, end) {/* ... */}
  })

  return root
}
我们看到 parse 方法会先定义初始化一些全局辅助函数
  warn = options.warn || baseWarn

  platformIsPreTag = options.isPreTag || no
  platformMustUseProp = options.mustUseProp || no
  platformGetTagNamespace = options.getTagNamespace || no
  const isReservedTag = options.isReservedTag || no
  maybeComponent = (el: ASTElement) => !!el.component || !isReservedTag(el.tag)

  transforms = pluckModuleFunction(options.modules, 'transformNode')
  preTransforms = pluckModuleFunction(options.modules, 'preTransformNode')
  postTransforms = pluckModuleFunction(options.modules, 'postTransformNode')

  delimiters = options.delimiters
然后针对该次解析初始化 AST 解析相关的变量
  // local init ...
  const stack = []
  const preserveWhitespace = options.preserveWhitespace !== false
  const whitespaceOption = options.whitespace
  let root
  let currentParent
  let inVPre = false
  let inPre = false
  let warned = false
最后调用 parseHTML 来对模版做最终的解析并生成 AST 返回 root。
  /* 解析 html */
  parseHTML(template, {
    warn,
    expectHTML: options.expectHTML,
    isUnaryTag: options.isUnaryTag,
    canBeLeftOpenTag: options.canBeLeftOpenTag,
    shouldDecodeNewlines: options.shouldDecodeNewlines,
    shouldDecodeNewlinesForHref: options.shouldDecodeNewlinesForHref,
    // 保留注释选项
    shouldKeepComment: options.comments,
    outputSourceRange: options.outputSourceRange,
    /* 解析开始标签 */
    start (tag, attrs, unary, start, end) {/* ... */}
    /* 解析结束标签 */
    end (tag, start, end) {/* ... */}
    /* 解析文本内容 */
    chars (text: string, start: number, end: number) {/* ... */}
    /* 解析注释标签 */
    comment (text: string, start, end) {/* ... */}
  })

  return root
这里的 parseHTML 方法相当于一个 HTML 解析器,由于我们针对不同的内容,在 Vue 中区分成了 HTML 解析器(parseHTML)和纯文本解析器(parseText)两种解析器。
这边我们看到 parse 的具体步骤就是调用 parseHTML,我们注意到第二个参数他传入了一个类似配置对象的存在,同时附加了四个钩子:start、end、chars、comment。这四个钩子主要就是处理 AST 节点的生成、闭合、添加等关系,这边先记着有这么四个东西,后面会再展开说明
2.3.1 parseHTML HTML解析器
下面我们探入到 parseHTML 方法内部
/src/compiler/parser/html-parser.js(阅读笔记文件路径:/src/compiler/parser/html-parser/parseHTML.flatx.js)
import { makeMap, no } from 'shared/util'
import { isNonPhrasingTag } from 'web/compiler/util'
import { unicodeRegExp } from 'core/util/lang'
// 正则表达式(标签、属性)
const attribute = /^\s*([^\s"'<>\/=]+)(?:\s*(=)\s*(?:"([^"]*)"+|'([^']*)'+|([^\s"'=<>`]+)))?/
const dynamicArgAttribute = /^\s*((?:v-[\w-]+:|@|:|#)\[[^=]+\][^\s"'<>\/=]*)(?:\s*(=)\s*(?:"([^"]*)"+|'([^']*)'+|([^\s"'=<>`]+)))?/
const ncname = `[a-zA-Z_][\\-\\.0-9_a-zA-Z${unicodeRegExp.source}]*`
const qnameCapture = `((?:${ncname}\\:)?${ncname})`
const startTagOpen = new RegExp(`^<${qnameCapture}`)
const startTagClose = /^\s*(\/?)>/
const endTag = new RegExp(`^<\\/${qnameCapture}[^>]*>`)
const doctype = /^<!DOCTYPE [^>]+>/i
// 注释标签
const comment = /^<!\--/
const conditionalComment = /^<!\[/
// 特殊标签
export const isPlainTextElement = makeMap('script,style,textarea', true)
const reCache = {}
// 特殊字符转义表
const decodingMap = {
'<': '<',
'>': '>',
'"': '"',
'&': '&',
' ': '\n',
'	': '\t',
''': "'"
}
const encodedAttr = /&(?:lt|gt|quot|amp|#39);/g
const encodedAttrWithNewLines = /&(?:lt|gt|quot|amp|#39|#10|#9);/g
const isIgnoreNewlineTag = makeMap('pre,textarea', true)
const shouldIgnoreFirstNewline = (tag, html) => tag && isIgnoreNewlineTag(tag) && html[0] === '\n'
function decodeAttr (value, shouldDecodeNewlines) {/* ... */}
export function parseHTML (html, options) {
const stack = []
const expectHTML = options.expectHTML
const isUnaryTag = options.isUnaryTag || no
const canBeLeftOpenTag = options.canBeLeftOpenTag || no
let index = 0
let last, lastTag
// 主流程
while (html) {
last = html
    if (!lastTag || !isPlainTextElement(lastTag)) {
      /* 在普通节点内 */
      // ...
    } else {
      /* style / script 节点内 */
      // ...
}
// 前后文本不变
if (html === last) {
// 直接匹配文本内容后返回
options.chars && options.chars(html)
// mal-formatted tag warning ...
break
}
}
// Clean up any remaining tags
parseEndTag()
function advance (n) {/* ... */}
function parseStartTag () {/* ... */}
function handleStartTag (match) {/* ... */}
function parseEndTag (tagName, start, end) {/* ... */}
}
在 parseHTML 内部是一个非常巨大的循环,需要不断遍历 template 模版直到整个 AST 构建完毕,而在这个循环的最外层我们需要先去分成两种情况:
- 一般 html 节点
if (!lastTag || !isPlainTextElement(lastTag)) {
/* 在普通节点内 */
// ...
- style / script 节点
} else {
/* style / script 节点内 */
// ...
由于 style、script 节点内容并不属于 HTML 文本的范畴,所以需要单独提取出来直接转换成普通文本节点(也就是原封不动的留下来),同时我们也不推荐在模版内嵌套使用 <style>、<script> 标签。下面我们分别看两种情况的处理
2.3.2 解析特殊文本标签 style / script
先看对于特殊标签的处理
    } else {
      /* style / script 节点内 */
      let endTagLength = 0
      const stackedTag = lastTag.toLowerCase()
      const reStackedTag = reCache[stackedTag] || (reCache[stackedTag] = new RegExp('([\\s\\S]*?)(</' + stackedTag + '[^>]*>)', 'i'))

      // 替换剩余文本
      const rest = html.replace(reStackedTag, function (all, text, endTag) {
        endTagLength = endTag.length
        if (!isPlainTextElement(stackedTag) && stackedTag !== 'noscript') {
          text = text
            .replace(/<!\--([\s\S]*?)-->/g, '$1') // #7298
            .replace(/<!\[CDATA\[([\s\S]*?)]]>/g, '$1')
        }
        if (shouldIgnoreFirstNewline(stackedTag, text)) {
          text = text.slice(1)
        }
        if (options.chars) {
          // 匹配 style / script 节点内文本
          options.chars(text)
        }
        return ''
      })
      index += html.length - rest.length
      html = rest
      parseEndTag(stackedTag, index - endTagLength, index)
    }
我们可以看到对于特殊标签(<style>、<script>),Vue 选择直接将整个文本内容取下并调用 options.chars(text) 来创建简单文本节点的处理方式,后面我们再细说 options.chars 是如何处理的
2.3.3 解析普通节点流程
而对于其他普通节点就没那么幸运了,有好多种节点类型要检查
    if (!lastTag || !isPlainTextElement(lastTag)) {
      /* 在普通节点内 */

      // 寻找下一个 < 的位置(即下一个标签的起始位置)
      let textEnd = html.indexOf('<')
      if (textEnd === 0) {
        /* case 1: 下一个标签位于开头 */

        // 1.1 检查是否为注释:<!--
        if (comment.test(html)) {
          const commentEnd = html.indexOf('-->')

          // 寻找注释结尾
          if (commentEnd >= 0) {
            if (options.shouldKeepComment) {
              // 可选是否保留注释
              options.comment(html.substring(4, commentEnd), index, index + commentEnd + 3)
            }
            // 前进到 --> 之后
            advance(commentEnd + 3)
            continue
          }
        }

        // 1.2 检查是否为条件注释:<![
        if (conditionalComment.test(html)) {
          const conditionalEnd = html.indexOf(']>')

          if (conditionalEnd >= 0) {
            // 前进到 ]> 之后
            advance(conditionalEnd + 2)
            continue
          }
        }

        // 1.3 Doctype<!DOCTYPE >
        const doctypeMatch = html.match(doctype)
        if (doctypeMatch) {
          advance(doctypeMatch[0].length)
          continue
        }

        // 1.4 结束标签:</xxx
        const endTagMatch = html.match(endTag)
        if (endTagMatch) {
          const curIndex = index
          advance(endTagMatch[0].length)  // 前进到 </xxx> 之后
          parseEndTag(endTagMatch[1], curIndex, index)
          continue
        }

        // 1.5 开始标签:<xxx
        const startTagMatch = parseStartTag()
        if (startTagMatch) {
          handleStartTag(startTagMatch)
          if (shouldIgnoreFirstNewline(startTagMatch.tagName, html)) {
            advance(1)
          }
          continue
        }
      }

      let text, rest, next
      if (textEnd >= 0) {
        /* case 2: 下一个标签前存在文本 */
        rest = html.slice(textEnd)
        while (
          !endTag.test(rest) &&
          !startTagOpen.test(rest) &&
          !comment.test(rest) &&
          !conditionalComment.test(rest)
        ) {
          // 允许标签前的 <
          next = rest.indexOf('<', 1)
          if (next < 0) break
          textEnd += next
          rest = html.slice(textEnd)
        }
        text = html.substring(0, textEnd)
      }

      /* case 3: 整段 html 都是文本 */
      if (textEnd < 0) {
        text = html
      }

      if (text) {
        // 前进到文本后
        advance(text.length)
      }

      if (options.chars && text) {
        // 解析文本并创建文本节点
        options.chars(text, index - text.length, index)
      }
我们看到前面几个块都是用 continue 跳过,也就是说其实是采用了多路分支的概念,将下一个可能出现的节点分为几种类型分别处理:
- 注释节点
<!-- -->
        // 1.1 检查是否为注释:<!--
        if (comment.test(html)) {
          const commentEnd = html.indexOf('-->')

          // 寻找注释结尾
          if (commentEnd >= 0) {
            if (options.shouldKeepComment) {
              // 可选是否保留注释
              options.comment(html.substring(4, commentEnd), index, index + commentEnd + 3)
            }
            // 前进到 --> 之后
            advance(commentEnd + 3)
            continue
          }
        }
- 条件注释节点
<![ ]>
        // 1.2 检查是否为条件注释:<![
        if (conditionalComment.test(html)) {
          const conditionalEnd = html.indexOf(']>')

          if (conditionalEnd >= 0) {
            // 前进到 ]> 之后
            advance(conditionalEnd + 2)
            continue
          }
        }
- Doctype 节点
<!DOCTYPE>
        // 1.3 Doctype<!DOCTYPE >
        const doctypeMatch = html.match(doctype)
        if (doctypeMatch) {
          advance(doctypeMatch[0].length)
          continue
        }
- 结束标签
</xxx>
        // 1.4 结束标签:</xxx
        const endTagMatch = html.match(endTag)
        if (endTagMatch) {
          const curIndex = index
          advance(endTagMatch[0].length)  // 前进到 </xxx> 之后
          parseEndTag(endTagMatch[1], curIndex, index)
          continue
        }
- 开始标签
<xxx>
        // 1.5 开始标签:<xxx
        const startTagMatch = parseStartTag()
        if (startTagMatch) {
          handleStartTag(startTagMatch)
          if (shouldIgnoreFirstNewline(startTagMatch.tagName, html)) {
            advance(1)
          }
          continue
        }
而如果不是上述五种标签则表示在标签前可能还存在一些文本 or 剩余 html 都是文本部分
      let text, rest, next
      if (textEnd >= 0) {
        /* case 2: 下一个标签前存在文本 */
        rest = html.slice(textEnd)
        while (
          !endTag.test(rest) &&
          !startTagOpen.test(rest) &&
          !comment.test(rest) &&
          !conditionalComment.test(rest)
        ) {
          // 允许标签前的 <
          next = rest.indexOf('<', 1)
          if (next < 0) break
          textEnd += next
          rest = html.slice(textEnd)
        }
        text = html.substring(0, textEnd)
      }

      /* case 3: 整段 html 都是文本 */
      if (textEnd < 0) {
        text = html
      }

      if (text) {
        // 前进到文本后
        advance(text.length)
      }

      if (options.chars && text) {
        // 解析文本并创建文本节点
        options.chars(text, index - text.length, index)
      }
对于文本节点我们就一样调用 options.chars 创建文本 AST 节点
2.3.3.1 parseStartTag 解析开始标签
还记得前面我们匹配开始标签的时候是这样做的
        // 1.5 开始标签:<xxx
        const startTagMatch = parseStartTag()
        if (startTagMatch) {
          handleStartTag(startTagMatch)
          if (shouldIgnoreFirstNewline(startTagMatch.tagName, html)) {
            advance(1)
          }
          continue
        }
首先调用了 parseStartTag 解析起始标签的内容
/src/compiler/parser/html-parser.js(阅读笔记文件路径:/src/compiler/parser/html-parser/parseHTML.flat2.parseStartTag.js)
  /* 匹配开始标签 */
  function parseStartTag () {
    // 匹配 <xxx
    const start = html.match(startTagOpen)
    if (start) {
      const match = {
        tagName: start[1],  // 标签名 xxx
        attrs: [],          // 属性列表
        start: index        // 起始位置
      }
      advance(start[0].length)  // 移动到 <xxx 之后
      let end, attr
      // end 匹配 > 或 />
      // attr 匹配属性
      while (!(end = html.match(startTagClose)) && (attr = html.match(dynamicArgAttribute) || html.match(attribute))) {
        attr.start = index
        advance(attr[0].length)
        attr.end = index
        match.attrs.push(attr)
      }
      if (end) {
        match.unarySlash = end[1]  // '/' 自闭合
        advance(end[0].length)
        match.end = index
        return match
      }
    }
  }
我们看到 parseStartTag 提取出了开始标签里的标签名、属性列表、可选自闭合符号,并放入 tagName, attrs, start 然后返回 match 对象
2.3.3.2 handleStartTag 处理开始标签
在 parseStartTag 方法之后则是调用了 handleStartTag 来处理起始标签
        const startTagMatch = parseStartTag()
        if (startTagMatch) {
          handleStartTag(startTagMatch)
/src/compiler/parser/html-parser.js(阅读笔记文件路径:/src/compiler/parser/html-parser/parseHTML.flat2.handleStartTag.js)
/* 处理开始标签 */
  function handleStartTag (match) {
    const tagName = match.tagName
    const unarySlash = match.unarySlash

    if (expectHTML) {
      // 处理前一个 p 未闭合
      if (lastTag === 'p' && isNonPhrasingTag(tagName)) {
        parseEndTag(lastTag)
      }
      // 处理允许未闭合标签
      if (canBeLeftOpenTag(tagName) && lastTag === tagName) {
        parseEndTag(tagName)
      }
    }

    const unary = isUnaryTag(tagName) || !!unarySlash

    const l = match.attrs.length
    const attrs = new Array(l)

    // 依序处理属性
    for (let i = 0; i < l; i++) {
      const args = match.attrs[i]
      const value = args[3] || args[4] || args[5] || ''
      const shouldDecodeNewlines = tagName === 'a' && args[1] === 'href'
        ? options.shouldDecodeNewlinesForHref
        : options.shouldDecodeNewlines
      // 属性名 / 属性值(转义)
      attrs[i] = {
        name: args[1],
        value: decodeAttr(value, shouldDecodeNewlines)
      }
      // 保留属性位置
      if (process.env.NODE_ENV !== 'production' && options.outputSourceRange) {
        attrs[i].start = args.start + args[0].match(/^\s*/).length
        attrs[i].end = args.end
      }
    }

    // 未闭合标签
    if (!unary) {
      stack.push({ tag: tagName, lowerCasedTag: tagName.toLowerCase(), attrs: attrs, start: match.start, end: match.end })
      lastTag = tagName
    }

    // 调用 start 钩子创建 AST 节点
    if (options.start) {
      options.start(tagName, attrs, unary, match.start, match.end)
    }
  }
首先先处理一些允许不加 / 而也算是自闭合的标签
    if (expectHTML) {
      // 处理前一个 p 未闭合
      if (lastTag === 'p' && isNonPhrasingTag(tagName)) {
        parseEndTag(lastTag)
      }
      // 处理允许未闭合标签
      if (canBeLeftOpenTag(tagName) && lastTag === tagName) {
        parseEndTag(tagName)
      }
    }
然后是遍历属性列表并将属性的名称和表达式拆开
    const l = match.attrs.length
    const attrs = new Array(l)

    // 依序处理属性
    for (let i = 0; i < l; i++) {
      const args = match.attrs[i]
      const value = args[3] || args[4] || args[5] || ''
      const shouldDecodeNewlines = tagName === 'a' && args[1] === 'href'
        ? options.shouldDecodeNewlinesForHref
        : options.shouldDecodeNewlines
      // 属性名 / 属性值(转义)
      attrs[i] = {
        name: args[1],
        value: decodeAttr(value, shouldDecodeNewlines)
      }
      // 保留属性位置
      if (process.env.NODE_ENV !== 'production' && options.outputSourceRange) {
        attrs[i].start = args.start + args[0].match(/^\s*/).length
        attrs[i].end = args.end
      }
    }
最后如果是未闭合标签则推入栈中
    // 未闭合标签
    if (!unary) {
      stack.push({ tag: tagName, lowerCasedTag: tagName.toLowerCase(), attrs: attrs, start: match.start, end: match.end })
      lastTag = tagName
    }
然后再调用 options.start 方法来根据开始标签创建 AST 节点
    // 调用 start 钩子创建 AST 节点
    if (options.start) {
      options.start(tagName, attrs, unary, match.start, match.end)
    }
2.3.3.3 parseEndTag 解析结束标签
第二种特殊情况我们看到,当解析器发现结束标签的时候
        // 1.4 结束标签:</xxx
        const endTagMatch = html.match(endTag)
        if (endTagMatch) {
          const curIndex = index
          advance(endTagMatch[0].length)  // 前进到 </xxx> 之后
          parseEndTag(endTagMatch[1], curIndex, index)
          continue
        }
会调用一个 parseEndTag 函数来解析结束标签
/src/compiler/parser/html-parser.js(阅读笔记文件路径:/src/compiler/parser/html-parser/parseHTML.flat2.parseEndTag.js)
/* 解析结束标签 */
  function parseEndTag (tagName, start, end) {
    let pos, lowerCasedTagName
    if (start == null) start = index
    if (end == null) end = index

    // 查找匹配起始标签
    if (tagName) {
      lowerCasedTagName = tagName.toLowerCase()
      for (pos = stack.length - 1; pos >= 0; pos--) {
        if (stack[pos].lowerCasedTag === lowerCasedTagName) {
          break
        }
      }
    } else {
      // 无结束标签名则置顶
      pos = 0
    }

    if (pos >= 0) {
      // 关闭对应标签上的所有标签
      for (let i = stack.length - 1; i >= pos; i--) {
        // no match end tag warning ...

        if (options.end) {
          options.end(stack[i].tag, start, end)
        }
      }
      // 移除对应起始标签
      stack.length = pos
      lastTag = pos && stack[pos - 1].tag
    } else if (lowerCasedTagName === 'br') {
      // br 自闭合
      if (options.start) {
        options.start(tagName, [], true, start, end)
      }
    } else if (lowerCasedTagName === 'p') {
      // p 自闭合
      if (options.start) {
        options.start(tagName, [], false, start, end)
      }
      if (options.end) {
        options.end(tagName, start, end)
      }
    }
  }
解析结束标签的逻辑算是比较简单直接的,首先从栈中寻找匹配的起始标签(可能写错了,不一定直接匹配)
    // 查找匹配起始标签
    if (tagName) {
      lowerCasedTagName = tagName.toLowerCase()
      for (pos = stack.length - 1; pos >= 0; pos--) {
        if (stack[pos].lowerCasedTag === lowerCasedTagName) {
          break
        }
      }
    } else {
      // 无结束标签名则置顶
      pos = 0
    }
接下来是强制闭合(options.end)栈顶不匹配的起始标签,并将当前标签记录到 lastTag
    if (pos >= 0) {
      // 关闭对应标签上的所有标签
      for (let i = stack.length - 1; i >= pos; i--) {
        // no match end tag warning ...

        if (options.end) {
          options.end(stack[i].tag, start, end)
        }
      }
      // 移除对应起始标签
      stack.length = pos
      lastTag = pos && stack[pos - 1].tag
对于 <br>、<p> 元素则允许直接闭合/自动补全(达成与原生 html 一样的特性)
    } else if (lowerCasedTagName === 'br') {
      // br 自闭合
      if (options.start) {
        options.start(tagName, [], true, start, end)
      }
    } else if (lowerCasedTagName === 'p') {
      // p 自闭合
      if (options.start) {
        options.start(tagName, [], false, start, end)
      }
      if (options.end) {
        options.end(tagName, start, end)
      }
    }
2.3.4 生成 AST 节点钩子
我们已经看到在 parseHTML 当中就是不断循环去匹配各种标签、文本节点,然后在透过调用 options 上的钩子来通知上层处理 AST 节点
我们再回到 parse 函数内好好再看看传入 parseHTML 的钩子有哪些
/src/compiler/parser/index.js(阅读笔记文件路径:/src/compiler/parser/index/parse.flat2.js)
  /* 解析 html */
  parseHTML(template, {
    warn,
    expectHTML: options.expectHTML,
    isUnaryTag: options.isUnaryTag,
    canBeLeftOpenTag: options.canBeLeftOpenTag,
    shouldDecodeNewlines: options.shouldDecodeNewlines,
    shouldDecodeNewlinesForHref: options.shouldDecodeNewlinesForHref,
    // 保留注释选项
    shouldKeepComment: options.comments,
    outputSourceRange: options.outputSourceRange,
    /* 解析开始标签 */
    start (tag, attrs, unary, start, end) {/* ... */}
    /* 解析结束标签 */
    end (tag, start, end) {/* ... */}
    /* 解析文本内容 */
    chars (text: string, start: number, end: number) {/* ... */}
    /* 解析注释标签 */
    comment (text: string, start, end) {/* ... */}
  })

  return root
走过 parseHTML 内部,我们已经知道我们会在 handleStartTag 调用 start 来创建节点;在 parseEndTag 的时候调用 end 来通知 AST 节点对应的标签已经关闭;在遇到文本、注释时分别调用 chars、comment 来创建对应节点,现在来看看细节
2.3.4.1 start 开始标签 -> 创建元素 AST 节点
/src/compiler/parser/index.js(阅读笔记文件路径:/src/compiler/parser/index/parse.flat2.parseHTMLoptions.start.js)
    /* 解析开始标签 */
    start (tag, attrs, unary, start, end) {
      // 1. 检查命名空间并继承
      const ns = (currentParent && currentParent.ns) || platformGetTagNamespace(tag)

      // 2. 检查是否为 svg
      if (isIE && ns === 'svg') {
        attrs = guardIESVGBug(attrs)
      }

      // 3. 创建 AST 节点 & 命名空间 ns
      let element: ASTElement = createASTElement(tag, attrs, currentParent)
      if (ns) {
        element.ns = ns
      }

      if (process.env.NODE_ENV !== 'production') {
        if (options.outputSourceRange) {
          // 3.x 记录元素原始信息:start, end, rawAttrsMap
          element.start = start
          element.end = end
          element.rawAttrsMap = element.attrsList.reduce((cumulated, attr) => {
            cumulated[attr.name] = attr
            return cumulated
          }, {})
        }
        // attrs contain special chars warning ...
      }

      // 4. 检查是否为特殊节点标签(style, script)
      if (isForbiddenTag(element) && !isServerRendering()) {
        element.forbidden = true
        // side-effects tag name warning ...
      }

      // 5. 加载预处理方法
      for (let i = 0; i < preTransforms.length; i++) {
        element = preTransforms[i](element, options) || element
      }

      // 6.1 检查 v-pre 标志
      if (!inVPre) {
        processPre(element)
        if (element.pre) {
          inVPre = true
        }
      }
      // 6.2平台相关检查 v-pre 标志
      if (platformIsPreTag(element.tag)) {
        inPre = true
      }
      if (inVPre) {
        // 7.1 处理简单属性列表
        processRawAttrs(element)
      } else if (!element.processed) {
        // 7.2 处理 vue 特别属性
        processFor(element)  // v-for
        processIf(element)   // v-if
        processOnce(element) // v-once
      }

      // 8. 检查根节点标签 & 属性
      if (!root) {
        root = element
        if (process.env.NODE_ENV !== 'production') {
          checkRootConstraints(root)
        }
      }

      // 9. 自闭合组件处理
      if (!unary) {
        currentParent = element
        stack.push(element)
      } else {
        closeElement(element)
      }
    },
我们看到 start 方法创建 AST 节点还是比较庞大的,大致分为九个段落,比较重要的是
- 透过
createASTElement方法创建具体 AST 节点
      // 3. 创建 AST 节点 & 命名空间 ns
      let element: ASTElement = createASTElement(tag, attrs, currentParent)
      if (ns) {
        element.ns = ns
      }

      if (process.env.NODE_ENV !== 'production') {
        if (options.outputSourceRange) {
          // 3.x 记录元素原始信息:start, end, rawAttrsMap
          element.start = start
          element.end = end
          element.rawAttrsMap = element.attrsList.reduce((cumulated, attr) => {
            cumulated[attr.name] = attr
            return cumulated
          }, {})
        }
        // attrs contain special chars warning ...
      }
createASTElement 就不再展开了,太多了自己去爬hh
- 根据
v-pre标签进行标记
      // 6.1 检查 v-pre 标志
      if (!inVPre) {
        processPre(element)
        if (element.pre) {
          inVPre = true
        }
      }
      // 6.2平台相关检查 v-pre 标志
      if (platformIsPreTag(element.tag)) {
        inPre = true
      }
- 针对特殊属性进行特殊处理(条件、列表渲染子节点)
      if (inVPre) {
        // 7.1 处理简单属性列表
        processRawAttrs(element)
      } else if (!element.processed) {
        // 7.2 处理 vue 特别属性
        processFor(element)  // v-for
        processIf(element)   // v-if
        processOnce(element) // v-once
      }
- 最后将节点插入 AST 节点树当中(
closeElement方法),或是压入栈中等待闭合标签
      // 9. 自闭合组件处理
      if (!unary) {
        currentParent = element
        stack.push(element)
      } else {
        closeElement(element)
      }
2.3.4.2 end 结束标签 -> 闭合元素 AST 节点
第二个钩子则是遇到结束标签的时候调用的 end 钩子,主要用于将节点拿出栈中并加入到 AST 树中
/src/compiler/parser/index.js(阅读笔记文件路径:/src/compiler/parser/index/parse.flat2.parseHTMLoptions.end.js)
    /* 解析结束标签 */
    end (tag, start, end) {
      // 从栈中弹出元素
      const element = stack[stack.length - 1]
      stack.length -= 1
      currentParent = stack[stack.length - 1]
      if (process.env.NODE_ENV !== 'production' && options.outputSourceRange) {
        element.end = end
      }
      // 闭合元素
      closeElement(element)
    },
闭合比较简单,就是出栈然后调用一下 closeElement 将节点加入 AST
        currentParent.children.push(element)
        element.parent = currentParent
大概是这么一句话,就不展开了,自己看源码或是看我笔记
2.3.4.3 chars 文本标签 -> 创建纯文本 AST 节点
对于文本节点
/src/compiler/parser/index.js(阅读笔记文件路径:/src/compiler/parser/index/parse.flat2.parseHTMLoptions.chars.js)
    /* 解析文本内容 */
    chars (text: string, start: number, end: number) {
      if (!currentParent) {
        // text as root warning ...
        return
      }

      // IE textarea placeholder bug
      if (isIE &&
        currentParent.tag === 'textarea' &&
        currentParent.attrsMap.placeholder === text
      ) {
        return
      }

      // 1. 处理文本节点内容
      const children = currentParent.children
      if (inPre || text.trim()) {
        // case 1: 非空文本
        text = isTextTag(currentParent) ? text : decodeHTMLCached(text)
      } else if (!children.length) {
        // case 2: 单一全空文本
        text = ''
      } else if (whitespaceOption) {
        // case 3: 全空文本(带选项 whitespaceOption)
        if (whitespaceOption === 'condense') {
          // in condense mode, remove the whitespace node if it contains
          // line break, otherwise condense to a single space
          text = lineBreakRE.test(text) ? '' : ' '
        } else {
          text = ' '
        }
      } else {
        // case 4: 全空文本
        text = preserveWhitespace ? ' ' : ''
      }

      // 2. 处理文本结果
      if (text) {
        // 2.1 处理 condense 选项
        if (!inPre && whitespaceOption === 'condense') {
          // condense consecutive whitespaces into single space
          // 换行符 -> 单空格
          text = text.replace(whitespaceRE, ' ')
        }
        let res
        let child: ?ASTNode

        // 2.2 创建 child
        if (!inVPre && text !== ' ' && (res = parseText(text, delimiters))) {
          child = {
            type: 2,
            expression: res.expression,
            tokens: res.tokens,
            text
          }
        } else if (text !== ' ' || !children.length || children[children.length - 1].text !== ' ') {
          child = {
            type: 3,
            text
          }
        }

        // 2.3 标记 start、end,并将节点加入 children 数组
        if (child) {
          if (process.env.NODE_ENV !== 'production' && options.outputSourceRange) {
            child.start = start
            child.end = end
          }
          children.push(child)
        }
      }
    },
看起来很长,其实就是三个部分
- 处理文本内容
      // 1. 处理文本节点内容
      const children = currentParent.children
      if (inPre || text.trim()) {
        // case 1: 非空文本
        text = isTextTag(currentParent) ? text : decodeHTMLCached(text)
      } else if (!children.length) {
        // case 2: 单一全空文本
        text = ''
      } else if (whitespaceOption) {
        // case 3: 全空文本(带选项 whitespaceOption)
        if (whitespaceOption === 'condense') {
          // in condense mode, remove the whitespace node if it contains
          // line break, otherwise condense to a single space
          text = lineBreakRE.test(text) ? '' : ' '
        } else {
          text = ' '
        }
      } else {
        // case 4: 全空文本
        text = preserveWhitespace ? ' ' : ''
      }
- 文本内容的格式化并创建文本节点(child)
      // 2. 处理文本结果
      if (text) {
        // 2.1 处理 condense 选项
        if (!inPre && whitespaceOption === 'condense') {
          // condense consecutive whitespaces into single space
          // 换行符 -> 单空格
          text = text.replace(whitespaceRE, ' ')
        }
        let res
        let child: ?ASTNode

        // 2.2 创建 child
        if (!inVPre && text !== ' ' && (res = parseText(text, delimiters))) {
          child = {
            type: 2,
            expression: res.expression,
            tokens: res.tokens,
            text
          }
        } else if (text !== ' ' || !children.length || children[children.length - 1].text !== ' ') {
          child = {
            type: 3,
            text
          }
        }
- 将节点塞入 AST 树
        // 2.3 标记 start、end,并将节点加入 children 数组
        if (child) {
          if (process.env.NODE_ENV !== 'production' && options.outputSourceRange) {
            child.start = start
            child.end = end
          }
          children.push(child)
        }
2.3.4.4 comment 注释标签 -> 创建注释 AST 节点
最后一种注释节点就更简单了
/src/compiler/parser/index.js(阅读笔记文件路径:/src/compiler/parser/index/parse.flat2.parseHTMLoptions.comment.js)
    /* 解析注释标签 */
    comment (text: string, start, end) {
      if (currentParent) {
        // 创建节点
        const child: ASTText = {
          type: 3,
          text,
          isComment: true
        }
        if (process.env.NODE_ENV !== 'production' && options.outputSourceRange) {
          child.start = start
          child.end = end
        }
        // 加入父节点
        currentParent.children.push(child)
      }
    }
直接创建就行了(加上 isComment: true 标记)
2.4 optimize 优化阶段
到此我们已经从原始模版中提炼出各个标签对,并将其转换成 AST 抽象语法树了,第二步我们先不急着生成代码,我们先来尝试看看有没有优化的空间
/src/compiler/optimizer.js(阅读笔记文件路径:/src/compiler/optimizer/optimize.js)
/* @flow */

import { makeMap, isBuiltInTag, cached, no } from 'shared/util'

let isStaticKey
let isPlatformReservedTag

const genStaticKeysCached = cached(genStaticKeys)

/* 编译优化 */
export function optimize (root: ?ASTElement, options: CompilerOptions) {
  if (!root) return

  // 创建静态属性名、平台保留标签名
  isStaticKey = genStaticKeysCached(options.staticKeys || '')
  isPlatformReservedTag = options.isReservedTag || no

  // 标记静态节点:node.static
  markStatic(root)
  // 标记静态根节点:node.staticRoot
  markStaticRoots(root, false)
}
我们可以看到 Vue 在模版编译过程的优化并不太多,其实就是对节点打上 static 静态节点标记 而已。如此一来对于一些没有动态绑定的内容或是标签就不需要重新解析生成,可以直接复用原本的节点
2.4.1 markStatic 标记静态节点
第一步是先调用 markStatic 初步标记静态节点
/src/compiler/optimizer.js(阅读笔记文件路径:/src/compiler/optimizer/markStatic.js)
/* 标记静态根节点 */
function markStatic (node: ASTNode) {
  // 检查并标记是否为静态节点
  node.static = isStatic(node)

  if (node.type === 1) {
    // 避开 slot 节点
    if (
      !isPlatformReservedTag(node.tag) &&
      node.tag !== 'slot' &&
      node.attrsMap['inline-template'] == null
    ) {
      return
    }

    // 递归标记子节点
    for (let i = 0, l = node.children.length; i < l; i++) {
      const child = node.children[i]
      markStatic(child)
      if (!child.static) {
        // 存在非静态子节点
        node.static = false
      }
    }

    // 递归条件编译子节点
    if (node.ifConditions) {
      for (let i = 1, l = node.ifConditions.length; i < l; i++) {
        const block = node.ifConditions[i].block
        markStatic(block)
        if (!block.static) {
          node.static = false
        }
      }
    }
  }
}
我们可以看到整个标记的过程还是比较简单的,首先调用 isStatic 判断自身是不是静态节点,然后遍历所有子节点(children)和条件编译子节点(ifConditions)递归调用 markStatic 进行标记
下面是判断节点是否为静态的方法,可以感受一下
/src/compiler/optimizer.js(阅读笔记文件路径:/src/compiler/optimizer/isStatic.js)
/* 检查是否为静态节点 */
function isStatic (node: ASTNode): boolean {
  // 动态绑定节点
  if (node.type === 2) {
    return false
  }
  // 文本节点
  if (node.type === 3) {
    return true
  }
  return !!(node.pre || (  // v-pre
    !node.hasBindings &&  // 没有动态绑定 @ :
    !node.if && !node.for &&  // 没有 v-if v-for
    !isBuiltInTag(node.tag) &&  // 不是内置节点
    isPlatformReservedTag(node.tag) &&  // 不是组件
    !isDirectChildOfTemplateFor(node) &&  // 不是 template / v-for 的直接子节点
    Object.keys(node).every(isStaticKey)  // 只包含静态属性名
  ))
}
2.4.2 markStaticRoots 标记静态根节点
完成了第一步的标记静态子节点之后,为什么还要再标记一次呢?我们先来看看代码
/src/compiler/optimizer.js(阅读笔记文件路径:/src/compiler/optimizer/markStaticRoots.js)
function markStaticRoots (node: ASTNode, isInFor: boolean) {
  if (node.type === 1) {
    // 静态节点 / v-once 即诶单
    if (node.static || node.once) {
      node.staticInFor = isInFor
    }

    // 允许本身静态而子节点为动态
    if (node.static && node.children.length && !(
      node.children.length === 1 &&
      node.children[0].type === 3
    )) {
      node.staticRoot = true
      return
    } else {
      node.staticRoot = false
    }

    // 递归标记子节点
    if (node.children) {
      for (let i = 0, l = node.children.length; i < l; i++) {
        markStaticRoots(node.children[i], isInFor || !!node.for)
      }
    }
    // 递归标记条件编译子节点
    if (node.ifConditions) {
      for (let i = 1, l = node.ifConditions.length; i < l; i++) {
        markStaticRoots(node.ifConditions[i].block, isInFor)
      }
    }
  }
}
我们可以看到,markStaticRoots 也是递归调用进行标记,不同的是对于单独一个节点不再根据其子节点影响标记,说明后续在进行比较的时候可以根据 staticRoot 标志只更新子节点而不用修改本节点,也是一步非常大的优化(如果只用 markStatic 的话,只要整颗树中存在一个动态节点,那整个树包括 root 都将变为非静态节点,使得整个静态节点的标记变得毫无意义)
2.5 generate 代码生成阶段
最后一个代码生成阶段,我们看到 generate 函数
/src/compiler/codegen/index.js(阅读笔记文件路径:/src/compiler/codegen/index/generate.js)
/* 生成渲染代码 */
export function generate (
  ast: ASTElement | void,
  options: CompilerOptions
): CodegenResult {
  const state = new CodegenState(options)
  const code = ast ? genElement(ast, state) : '_c("div")'
  return {
    render: `with(this){return ${code}}`,
    staticRenderFns: state.staticRenderFns
  }
}
我们偷看到其实最终生成的 render 文本是这样一个形式
render: `with(this){return ${code}}`,
这边爆个雷,其实 Vue 是利用了 new Function(codeStr) 的方式来动态创建 render 函数的,也就是说接下来我们要生成的代码其实就是 render 函数内要被调用的脚本文本。
2.5.1 installRenderHelpers render辅助函数
在开始生成代码之前我们先回顾一下在 renderMixin 的时候曾经有过这么一段话
/src/core/instance/render.js(阅读笔记文件路径:/src/core/instance/render/renderMixin.flat1.js)
// 注入
//   Vue.prototype.$nextTick
//   Vue.prototype._render

export function renderMixin (Vue: Class<Component>) {
  /* 注入 render helpers */
  installRenderHelpers(Vue.prototype)

  Vue.prototype.$nextTick = function (fn: Function) {/* ... */}

  Vue.prototype._render = function (): VNode {/* ... */}
}
在这里调用了一个 installRenderHelpers 就是用来帮助生成代码用的
/src/core/instance/render-helpers/index.js(阅读笔记文件路径:/src/core/instance/render-helpers/index.js)
/* @flow */

import { toNumber, toString, looseEqual, looseIndexOf } from 'shared/util'
import { createTextVNode, createEmptyVNode } from 'core/vdom/vnode'
import { renderList } from './render-list'
import { renderSlot } from './render-slot'
import { resolveFilter } from './resolve-filter'
import { checkKeyCodes } from './check-keycodes'
import { bindObjectProps } from './bind-object-props'
import { renderStatic, markOnce } from './render-static'
import { bindObjectListeners } from './bind-object-listeners'
import { resolveScopedSlots } from './resolve-scoped-slots'
import { bindDynamicKeys, prependModifier } from './bind-dynamic-keys'

export function installRenderHelpers (target: any) {
  target._o = markOnce
  target._n = toNumber
  target._s = toString
  target._l = renderList
  target._t = renderSlot
  target._q = looseEqual
  target._i = looseIndexOf
  target._m = renderStatic
  target._f = resolveFilter
  target._k = checkKeyCodes
  target._b = bindObjectProps
  target._v = createTextVNode
  target._e = createEmptyVNode
  target._u = resolveScopedSlots
  target._g = bindObjectListeners
  target._d = bindDynamicKeys
  target._p = prependModifier
}
我们看到这里向 Vue.prototype 注入了一堆 _x 的函数,就是我们即将在生成的代码中调用
2.5.2 genElement 生成元素节点
回到 generate 方法的调用
/src/compiler/codegen/index.js(阅读笔记文件路径:/src/compiler/codegen/index/generate.js)
/* 生成渲染代码 */
export function generate (
  ast: ASTElement | void,
  options: CompilerOptions
): CodegenResult {
  const state = new CodegenState(options)
  const code = ast ? genElement(ast, state) : '_c("div")'
  return {
    render: `with(this){return ${code}}`,
    staticRenderFns: state.staticRenderFns
  }
}
我们看到整个 AST 就作为一个组件调用 genElement 方法之后由 render 直接返回
/src/compiler/codegen/index.js(阅读笔记文件路径:/src/compiler/codegen/index/genElement.js)
/* @flow */

import { genHandlers } from './events'
import baseDirectives from '../directives/index'
import { camelize, no, extend } from 'shared/util'
import { baseWarn, pluckModuleFunction } from '../helpers'
import { emptySlotScopeToken } from '../parser/index'

type TransformFunction = (el: ASTElement, code: string) => string;
type DataGenFunction = (el: ASTElement) => string;
type DirectiveFunction = (el: ASTElement, dir: ASTDirective, warn: Function) => boolean;

export class CodegenState {/* ... */}

export type CodegenResult = {
  render: string,
  staticRenderFns: Array<string>
};

/* 生成元素节点 */
export function genElement (el: ASTElement, state: CodegenState): string {
  if (el.parent) {
    el.pre = el.pre || el.parent.pre
  }

  if (el.staticRoot && !el.staticProcessed) {
    /* 生成静态节点 */
    return genStatic(el, state)
  } else if (el.once && !el.onceProcessed) {
    /* 生成 v-once 节点 */
    return genOnce(el, state)
  } else if (el.for && !el.forProcessed) {
    /* 生成 v-for 节点 */
    return genFor(el, state)
  } else if (el.if && !el.ifProcessed) {
    /* 生成 v-if 节点 */
    return genIf(el, state)
  } else if (el.tag === 'template' && !el.slotTarget && !state.pre) {
    /* 生成 template 子节点 */
    return genChildren(el, state) || 'void 0'
  } else if (el.tag === 'slot') {
    /* 生成 slot 插槽节点 */
    return genSlot(el, state)
  } else {
    /* 生成组件节点 or 一般元素节点 */
    let code
    if (el.component) {
      // 组件节点
      code = genComponent(el.component, el, state)
    } else {
      // 一般元素节点
      let data
      if (!el.plain || (el.pre && state.maybeComponent(el))) {
        // 生成数据:data = { ... }
        data = genData(el, state)
      }

      // 生成子节点列表:[ children ]
      const children = el.inlineTemplate ? null : genChildren(el, state, true)

      const tagStr = `${el.tag}`
      const dataStr = data ? `,${data}` : ''
      const childrenStr = children ? `,${children}` : ''

      // 生成代码:_c(tag, data, [ children ])
      code = `_c(${tagStr}${dataStr}${childrenStr})`
    }
    // 选项 transforms 后处理模块
    for (let i = 0; i < state.transforms.length; i++) {
      code = state.transforms[i](el, code)
    }
    return code
  }
}

// ...
我们可以看到 genElement 就是递归调用各种 genXxx 方法之后,将最终生成的代码返回(return code)
下面我们一个个来看看各种节点的生成
2.5.3 genStatic 生成静态节点
对于静态节点
  if (el.staticRoot && !el.staticProcessed) {
    /* 生成静态节点 */
    return genStatic(el, state)
调用了方法 genStatic
/src/compiler/codegen/index.js(阅读笔记文件路径:/src/compiler/codegen/index/genStatic.js)
/* 生成静态节点 */
function genStatic (el: ASTElement, state: CodegenState): string {
  el.staticProcessed = true

  // 递归生成静态子节点
  const originalPreState = state.pre
  if (el.pre) {
    state.pre = el.pre
  }
  state.staticRenderFns.push(`with(this){return ${genElement(el, state)}}`)
  state.pre = originalPreState

  // 生成代码:_m(n, staticInFor)
  return `_m(${
    state.staticRenderFns.length - 1
  }${
    el.staticInFor ? ',true' : ''
  })`
}
静态节点递归调用 genElement 之后返回调用 _m() 方法的代码
2.5.4 genOnce 生成 v-once 节点
对于包含 v-once 属性的节点
  } else if (el.once && !el.onceProcessed) {
    /* 生成 v-once 节点 */
    return genOnce(el, state)
调用 genOnce 方法
/src/compiler/codegen/index.js(阅读笔记文件路径:/src/compiler/codegen/index/genOnce.js)
/* 生成 v-once 节点 */
function genOnce (el: ASTElement, state: CodegenState): string {
  el.onceProcessed = true

  if (el.if && !el.ifProcessed) {
    // 生成 v-if 节点
    return genIf(el, state)
  } else if (el.staticInFor) {
    // 生成 staticInFor 节点
    let key = ''
    let parent = el.parent
    while (parent) {
      if (parent.for) {
        key = parent.key
        break
      }
      parent = parent.parent
    }
    if (!key) {
      // v-once not in keyed v-for warning ...
      return genElement(el, state)
    }
    // 生成代码:_o(element, onceId, key)
    return `_o(${genElement(el, state)},${state.onceId++},${key})`
  } else {
    // 生成一般静态节点
    return genStatic(el, state)
  }
}
首先将 v-if 节点分开(调用 genIf),其余则递归调用 genElement,并返回调用 _o 的代码
2.5.5 genFor 生成 v-for 节点
再来对于 v-for 的节点
  } else if (el.for && !el.forProcessed) {
    /* 生成 v-for 节点 */
    return genFor(el, state)
调用 genFor 方法
/src/compiler/codegen/index.js(阅读笔记文件路径:/src/compiler/codegen/index/genFor.js)
/* 生成 v-for 节点 */
export function genFor (
  el: any,
  state: CodegenState,
  altGen?: Function,
  altHelper?: string
): string {
  const exp = el.for
  const alias = el.alias
  const iterator1 = el.iterator1 ? `,${el.iterator1}` : ''
  const iterator2 = el.iterator2 ? `,${el.iterator2}` : ''

  // no key in v-for warning ...

  el.forProcessed = true // avoid recursion

  // 生成代码:_l((exp), function(item, index, arr) { return genElement(el, state) })
  return `${altHelper || '_l'}((${exp}),` +
    `function(${alias}${iterator1}${iterator2}){` +
      `return ${(altGen || genElement)(el, state)}` +
    '})'
}
对于列表渲染则返回调用了 _l 的方法,并在内部递归调用 genElement 方法
2.5.6 genIf 生成 v-if 节点
对于 v-if 的节点
  } else if (el.if && !el.ifProcessed) {
    /* 生成 v-if 节点 */
    return genIf(el, state)
调用 genIf
/src/compiler/codegen/index.js(阅读笔记文件路径:/src/compiler/codegen/index/genIf.js)
/* 生成 v-if 节点 */
export function genIf (
  el: any,
  state: CodegenState,
  altGen?: Function,
  altEmpty?: string
): string {
  el.ifProcessed = true // avoid recursion
  // 生成 ifConditions 条件编译
  return genIfConditions(el.ifConditions.slice(), state, altGen, altEmpty)
}
比较特别的是对于 v-if 需要特别调用 genIfConditions 来生成对应的条件编译代码
/src/compiler/codegen/index.js(阅读笔记文件路径:/src/compiler/codegen/index/genIfConditions.js)
/* 生成 v-if、v-else-if、v-else 条件编译 */
function genIfConditions (
  conditions: ASTIfConditions,
  state: CodegenState,
  altGen?: Function,
  altEmpty?: string
): string {
  // 空条件编译列表:_e()
  if (!conditions.length) {
    return altEmpty || '_e()'
  }

  const condition = conditions.shift()
  if (condition.exp) {
    // 生成代码:exp ? ternaryExp : ifConditions
    return `(${condition.exp})?${
      genTernaryExp(condition.block)
    }:${
      genIfConditions(conditions, state, altGen, altEmpty)
    }`
  } else {
    // 生成代码:ternaryExp
    return `${genTernaryExp(condition.block)}`
  }

  // v-if with v-once should generate code like (a)?_m(0):_m(1)
  // 生成代码:
  //   altGen -> altGen(el, state)
  //   once -> genOnce(el, state)
  //        -> genEleemnt(el, state)
  function genTernaryExp (el) {
    return altGen
      ? altGen(el, state)
      : el.once
        ? genOnce(el, state)
        : genElement(el, state)
  }
}
genIfConditions 生成的条件编译代码其实就是利用了三元运算符
    // 生成代码:exp ? ternaryExp : ifConditions
    return `(${condition.exp})?${
      genTernaryExp(condition.block)
    }:${
      genIfConditions(conditions, state, altGen, altEmpty)
    }`
2.5.7 genChildren 生成 template 子节点
对于 <template> 非实元素
  } else if (el.tag === 'template' && !el.slotTarget && !state.pre) {
    /* 生成 template 子节点 */
    return genChildren(el, state) || 'void 0'
则直接调用 genChildren 将所有内容视为子节点
/src/compiler/codegen/index.js(阅读笔记文件路径:/src/compiler/codegen/index/genChildren.js)
/* 生成子节点 */
export function genChildren (
  el: ASTElement,
  state: CodegenState,
  checkSkip?: boolean,
  altGenElement?: Function,
  altGenNode?: Function
): string | void {
  const children = el.children
  if (children.length) {
    const el: any = children[0]

    // 单一 v-for 节点
    if (children.length === 1 &&
      el.for &&
      el.tag !== 'template' &&
      el.tag !== 'slot'
    ) {
      const normalizationType = checkSkip
        ? state.maybeComponent(el) ? `,1` : `,0`
        : ``
      // 生成代码:genElement(el, state), normalizationType
      return `${(altGenElement || genElement)(el, state)}${normalizationType}`
    }

    const normalizationType = checkSkip
      ? getNormalizationType(children, state.maybeComponent)
      : 0
    const gen = altGenNode || genNode

    // 生成代码:[ gen(c, state), ... ], normalizationType
    return `[${children.map(c => gen(c, state)).join(',')}]${
      normalizationType ? `,${normalizationType}` : ''
    }`
  }
}
genChildren 也是比较直接,首先对 v-for 节点进行优化(个别处理)
    // 单一 v-for 节点
    if (children.length === 1 &&
      el.for &&
      el.tag !== 'template' &&
      el.tag !== 'slot'
    ) {
      const normalizationType = checkSkip
        ? state.maybeComponent(el) ? `,1` : `,0`
        : ``
      // 生成代码:genElement(el, state), normalizationType
      return `${(altGenElement || genElement)(el, state)}${normalizationType}`
    }
其余的则是返回一个子节点数组
    const normalizationType = checkSkip
      ? getNormalizationType(children, state.maybeComponent)
      : 0
    const gen = altGenNode || genNode

    // 生成代码:[ gen(c, state), ... ], normalizationType
    return `[${children.map(c => gen(c, state)).join(',')}]${
      normalizationType ? `,${normalizationType}` : ''
    }`
2.5.8 genSlot 生成 slot 插槽节点
对于 <slot> 插槽节点
  } else if (el.tag === 'slot') {
    /* 生成 slot 插槽节点 */
    return genSlot(el, state)
则是使用 genSlot
/src/compiler/codegen/index.js(阅读笔记文件路径:/src/compiler/codegen/index/genSlot.js)
/* 生成 slot 插槽节点 */
function genSlot (el: ASTElement, state: CodegenState): string {
  const slotName = el.slotName || '"default"'
  const children = genChildren(el, state)
  const childrenStr = children ? `,${children}` : ''
  // 生成代码:_t(name, [ children ]
  let res = `_t(${slotName}${childrenStr}`

  // 生成属性列表:attrs = {} 或 _t({}, [])
  const attrs = el.attrs || el.dynamicAttrs
    ? genProps((el.attrs || []).concat(el.dynamicAttrs || []).map(attr => ({
        // slot props are camelized
        name: camelize(attr.name),
        value: attr.value,
        dynamic: attr.dynamic
      })))
    : null
  const bind = el.attrsMap['v-bind']  // 存在动态绑定属性
  if ((attrs || bind) && !children) {
    res += `,null`  // 没有属性、绑定属性、子节点时进行填充
  }
  if (attrs) {
    res += `,${attrs}`  // 存在属性列表时填充
  }
  if (bind) {  // 有绑定属性
    res += `${attrs ? '' : ',null'},${bind}`
  }

  // 生成代码:
  //   有子节点:_t(name, [ children ], attrs, bind)
  //   没有子节点:_t(name, null, attrs, bind)
  //   没有属性:_t(name, null, null, bind)
  return res + ')'
}
首先先生成属性列表
  // 生成属性列表:attrs = {} 或 _t({}, [])
  const attrs = el.attrs || el.dynamicAttrs
    ? genProps((el.attrs || []).concat(el.dynamicAttrs || []).map(attr => ({
        // slot props are camelized
        name: camelize(attr.name),
        value: attr.value,
        dynamic: attr.dynamic
      })))
    : null
最后组合成代码,调用的是 _t
  const bind = el.attrsMap['v-bind']  // 存在动态绑定属性
  if ((attrs || bind) && !children) {
    res += `,null`  // 没有属性、绑定属性、子节点时进行填充
  }
  if (attrs) {
    res += `,${attrs}`  // 存在属性列表时填充
  }
  if (bind) {  // 有绑定属性
    res += `${attrs ? '' : ',null'},${bind}`
  }

  // 生成代码:
  //   有子节点:_t(name, [ children ], attrs, bind)
  //   没有子节点:_t(name, null, attrs, bind)
  //   没有属性:_t(name, null, null, bind)
  return res + ')'
}
2.5.9 genComponent 生成组件节点
最后两种情况比较特殊,第一种是组件节点
  } else {
    /* 生成组件节点 or 一般元素节点 */
    let code
    if (el.component) {
      // 组件节点
      code = genComponent(el.component, el, state)
调用 genComponent 方法
/src/compiler/codegen/index.js(阅读笔记文件路径:/src/compiler/codegen/index/genComponent.js)
/* 生成组件节点 */
function genComponent (
  componentName: string,
  el: ASTElement,
  state: CodegenState
): string {
  const children = el.inlineTemplate ? null : genChildren(el, state, true)
  const childrenStr = children ? `,${children}` : ''
  // 生成代码:_c(name, data, [ children ])
  return `_c(${componentName},${genData(el, state)}${childrenStr})`
}
我们可以看到对于一个组件,先利用 genChildren 生成子节点列表,然后调用 genData 生成数据对象
/src/compiler/codegen/index.js(阅读笔记文件路径:/src/compiler/codegen/index/genData.js)
/* 生成 data 属性 */
export function genData (el: ASTElement, state: CodegenState): string {
  let data = '{'

  // 1. directives 属性
  const dirs = genDirectives(el, state)
  if (dirs) data += dirs + ','

  // 2. key 属性
  if (el.key) {
    data += `key:${el.key},`
  }

  // 3. ref 属性
  if (el.ref) {
    data += `ref:${el.ref},`
  }

  // 4. refInFor 标志
  if (el.refInFor) {
    data += `refInFor:true,`
  }

  // 5. pre 标志
  if (el.pre) {
    data += `pre:true,`
  }

  // 6. tag 标签
  if (el.component) {
    data += `tag:"${el.tag}",`
  }

  // 7. data 数据模块生成
  for (let i = 0; i < state.dataGenFns.length; i++) {
    data += state.dataGenFns[i](el)
  }

  // 8. props 属性
  if (el.attrs) {
    data += `attrs:${genProps(el.attrs)},`
  }

  // 9. DOM props 属性
  if (el.props) {
    data += `domProps:${genProps(el.props)},`
  }

  // 10. handlers 属性
  if (el.events) {
    // events
    data += `${genHandlers(el.events, false)},`
  }
  if (el.nativeEvents) {
    // nativeEvents
    data += `${genHandlers(el.nativeEvents, true)},`
  }

  // 11. non-scoped slot 插槽属性
  if (el.slotTarget && !el.slotScope) {
    data += `slot:${el.slotTarget},`
  }

  // 12. scoped slots
  if (el.scopedSlots) {
    data += `${genScopedSlots(el, el.scopedSlots, state)},`
  }

  // 13. v-model 属性
  if (el.model) {
    data += `model:{value:${
      el.model.value
    },callback:${
      el.model.callback
    },expression:${
      el.model.expression
    }},`
  }

  // 14. inline-template 属性
  if (el.inlineTemplate) {
    const inlineTemplate = genInlineTemplate(el, state)
    if (inlineTemplate) {
      data += `${inlineTemplate},`
    }
  }

  data = data.replace(/,$/, '') + '}'

  // 动态绑定包装函数:_b(data, "tag", props)
  if (el.dynamicAttrs) {
    data = `_b(${data},"${el.tag}",${genProps(el.dynamicAttrs)})`
  }
  // 动态绑定属性
  if (el.wrapData) {
    data = el.wrapData(data)
  }
  // 动态绑定事件处理函数
  if (el.wrapListeners) {
    data = el.wrapListeners(data)
  }

  // 生成代码:
  /*
  data = {
    dirs,
    key: val,
    ref: val,
    refInFor: true,
    pre: true,
    tag: "tagName",
    dataGenFns[n](el),
    props,
    domProps,
    handlers,
    slot: slotTarget,
    scopedSlots,
    value: val,
    callback: val,
    expression: val,
  }
  */
  return data
}
一大堆的属性,自己慢慢看呗hh
最后生成 _c(name, data, [ children ]) 形式的代码是为组件
2.5.10 生成一般元素节点
如果情况不是上述任何一种节点,那就是普通的内置节点咯(真是的到这里才真的呼应他的方法名 genElement)
/src/compiler/codegen/index.js(阅读笔记文件路径:/src/compiler/codegen/index/genElement.js)
    } else {
      // 一般元素节点
      let data
      if (!el.plain || (el.pre && state.maybeComponent(el))) {
        // 生成数据:data = { ... }
        data = genData(el, state)
      }

      // 生成子节点列表:[ children ]
      const children = el.inlineTemplate ? null : genChildren(el, state, true)

      const tagStr = `${el.tag}`
      const dataStr = data ? `,${data}` : ''
      const childrenStr = children ? `,${children}` : ''

      // 生成代码:_c(tag, data, [ children ])
      code = `_c(${tagStr}${dataStr}${childrenStr})`
对于一般节点来说,其实也是调用 genData 生成数据、genChildren 生成子节点,最后返回 _c(tag, data, [ children ]) 差别在于对于标签的分类不太相似吧
2.6 生成的文本去哪里了?
呼终于生成完了!我们回到 generate 函数
/src/compiler/codegen/index.js(阅读笔记文件路径:/src/compiler/codegen/index/generate.js)
/* 生成渲染代码 */
export function generate (
  ast: ASTElement | void,
  options: CompilerOptions
): CodegenResult {
  const state = new CodegenState(options)
  const code = ast ? genElement(ast, state) : '_c("div")'
  return {
    render: `with(this){return ${code}}`,
    staticRenderFns: state.staticRenderFns
  }
}
code 就是我们辛辛苦苦透过一大堆的 genXxx 递归生成的代码啦!套上 with(this){return code} 的外壳,还是一段文本啊,那我们要怎么调用这个 render "函数"呢?
其实前面已经破梗了,秘密就藏在 createCompilerCreator 函数里
2.6.1 createCompilerCreator 创建编译器生成器
还记得我们前面在 createCompilerCreator 函数看到的是这样的代码
/src/compiler/index.js(阅读笔记文件路径:/src/compiler/index.js)
/* 创建模版编译函数 */
export const createCompiler = createCompilerCreator(function baseCompile (
  template: string,
  options: CompilerOptions
): CompiledResult {
  // 解析 html 文本
  const ast = parse(template.trim(), options)
  if (options.optimize !== false) {
    // 优化 AST 节点树(标记静态节点)
    optimize(ast, options)
  }
  // 生成渲染代码
  const code = generate(ast, options)
  return {
    ast,
    render: code.render,
    staticRenderFns: code.staticRenderFns
  }
})
我们发现我们并不是真正直接调用 baseCompile,反而只是作为一个参数传入 createCompilerCreator 方法而已,所以我们进去看看
/src/compiler/create-compiler.js(阅读笔记文件路径:/src/compiler/create-compiler.flat3.js)
/* @flow */

import { extend } from 'shared/util'
import { detectErrors } from './error-detector'
import { createCompileToFunctionFn } from './to-function'

export function createCompilerCreator (baseCompile: Function): Function {
  return function createCompiler (baseOptions: CompilerOptions) {
    function compile (
      template: string,
      options?: CompilerOptions
    ): CompiledResult {
      const finalOptions = Object.create(baseOptions)
      const errors = []
      const tips = []

      let warn = (msg, range, tip) => {
        (tip ? tips : errors).push(msg)
      }

      if (options) {/* merge options ... */}

      finalOptions.warn = warn

      const compiled = baseCompile(template.trim(), finalOptions)
      if (process.env.NODE_ENV !== 'production') {
        detectErrors(compiled.ast, warn)
      }
      compiled.errors = errors
      compiled.tips = tips
      return compiled
    }

    return {
      compile,
      compileToFunctions: createCompileToFunctionFn(compile)
    }
  }
}
其实我们可以看到 createCompilerCreator 函数将原来的 baseCompile 封装成一个新的 compile 方法,最后在调用 createCompileToFunctionFn 生成 compileToFunctions
2.6.2 createCompileToFunctionFn 根据文本脚本生成函数
/src/compiler/to-function.js(阅读笔记文件路径:/src/compiler/to-function.flat3.js)
export function createCompileToFunctionFn (compile: Function): Function {
  const cache = Object.create(null)

  return function compileToFunctions (
    template: string,
    options?: CompilerOptions,
    vm?: Component
  ): CompiledFunctionResult {
    options = extend({}, options)
    const warn = options.warn || baseWarn
    delete options.warn

    // CSP policy warning ...

    // check cache
    const key = options.delimiters
      ? String(options.delimiters) + template
      : template
    if (cache[key]) {
      return cache[key]
    }

    // compile
    const compiled = compile(template, options)

    // compile errors warning & tips ...

    // turn code into functions
    const res = {}
    const fnGenErrors = []
    res.render = createFunction(compiled.render, fnGenErrors)
    res.staticRenderFns = compiled.staticRenderFns.map(code => {
      return createFunction(code, fnGenErrors)
    })

    // generate render fail ...

    return (cache[key] = res)
  }
}
我们看到其实 createCompileToFunctionFn 也没干嘛,就是将原来的 compile 再封装一层变成 compileToFunctions,内部其实还是调用了原本的 compile 也就是 baseCompile 方法。
    // compile
    const compiled = compile(template, options)
最后再将生成的 render 调用 createFunction 转换成真实的函数
function createFunction (code, errors) {
  try {
    return new Function(code)
  } catch (err) {
    errors.push({ err, code })
    return noop
  }
}
到此就大功告成啦!我们的 render 函数就是这么来的
2.6.3 this.$options.render 最终调用位置
最后我们重新梳理一下流程
baseCompile 是最核心的编译方法,经过 parse、optimize、generate 以及多层的封装后生成 render 函数并放到 vm.$options.render
而在首次挂载组件(mountComponent)/更新组件的时候,由于观察者的创建(constructor -> get -> getter)调用了 updateComponent 来首次渲染/更新 DOM。
updateComponent 的详细步骤则是分为 _render 和 _update 两步。_render 先利用了前面生成的 render 函数配合当下的数据生成虚拟 DOM;然后 _update 比较新旧两棵树的差别并进行更新(这是前一篇的内容)
结语
到此已经大功告成啦!Vue 的源码解析就要在这边告一段落了。参考 Vue 中文社区的分类,将整个 Vue 的源码核心分为:响应式原理、虚拟 DOM & diff 算法、模版编译原理三个部分,再加上借由走过整个组件的生命周期来了解整个组件的运行时完整流程,供大家参考。
后期会接着去学习 React 的写法,有机会也会写写看 React 的源码解析,还请各位多多指教。
其他资源
参考连接
| Title | Link |
|---|---|
| Vue源码系列-Vue中文社区 | https://vue-js.com/learn-vue/virtualDOM/ |
| vuejs/vue-2.6.12-Github | https://github.com/vuejs/vue/tree/v2.6.12 |
阅读笔记参考
https://github.com/superfreeeee/Blog-code/tree/main/source_code_research/vue-2.6.12
原文链接:https://blog.csdn.net/weixin_44691608/article/details/117271041
所属网站分类: 技术文章 > 博客
作者:麻辣小龙虾
链接:http://www.qianduanheidong.com/blog/article/116041/8db85bafe1adc0edde22/
来源:前端黑洞网
任何形式的转载都请注明出处,如有侵权 一经发现 必将追究其法律责任
昵称:
评论内容:(最多支持255个字符)
---无人问津也好,技不如人也罢,你都要试着安静下来,去做自己该做的事,而不是让内心的烦躁、焦虑,坏掉你本来就不多的热情和定力